
Stone Lake Salmon Salad
“Partner, let me upgrade you.” — Beyoncé
This salmon salad recipe upgrades and elevates your tuna salad of old with baked salmon, fresh dill and parsley, smoky paprika and a burst of citrus. Given the scraped-clean serving bowl left on the kitchen island, I would dare say we’ll be adding this to our simple salad rotation. Hope it’ll land on your list, too.

Instructions:
Roasted salmon:
4 skin-on salmon fillets, approximately 2 lbs.
1 tablespoon olive oil
Kosher salt, to taste
Coarsely ground black pepper, to taste
Smoked paprika, to taste
Salmon salad:
1/3 cup scallions, sliced
1/3 cup fresh dill, chopped
1/3 cup parsley, chopped
½ cup celery, chopped
¼ cup + 2 tablespoons mayonnaise
2 teaspoons Dijon mustard
2 tablespoons fresh lemon juice
½ teaspoon smoked paprika
¼ teaspoon cayenne pepper
Salt, to taste
Pepper, to taste
A pinch of raw sugar (optional)
1. Preheat oven to 400°F and line baking sheet with parchment paper.
2. Pat dry the salmon fillets with a paper towel and drizzle each fillet with olive oil. Be sure to rub the oil evenly on each piece. Season to taste with salt, pepper and smoked paprika. Rest at room temperature for 10 – 20 minutes, then bake in the oven for 10 – 15 minutes until the salmon’s thickest portion is almost cooked through.
3. While the salmon is baking, prep the vegetables for the salad dressing: chop your dill, parsley, celery and scallions and set aside.
4. In a large bowl, combine the mayonnaise, Dijon mustard, lemon juice, paprika, cayenne pepper, salt, pepper and pinch of raw sugar. Mix well. Fold in all of the vegetables and herbs.
5. Remove the skin from the cooked and slightly cooled salmon and place it in a medium-sized bowl. Using two forks, gently flake the fish, then add to the larger bowl of dressing. Mix until all of the salmon, herbs, veggies and sauce are fully incorporated.
6. Give it a taste, adjust the seasonings to your liking and chill in the refrigerator for at least 30 minutes.
My Two Cents:
I add a heaping ½ cup of celery to the salad because we like the added crunch.
If you like citrus and smokiness like I do, top your salmon salad with a squeeze of lemon, a sprinkle of smoked paprika and one more dash of black pepper before your first forkful.
How to enjoy this dish? Any way you like. You can serve it as is with crackers on the side. It’s also fantastic with a charcuterie board, on a croissant, atop a salad or rolled tightly into a tortilla wrap. Try them all.
Stone Lake Salmon Salad

Ingredients
Instructions
- Preheat oven to 400°F and line baking sheet with parchment paper.
- Pat dry the salmon fillets with a paper towel and drizzle each fillet with olive oil. Be sure to rub the oil evenly on each piece. Season to taste with salt, pepper and smoked paprika. Rest at room temperature for 10 – 20 minutes, then bake in the oven for 10 – 15 minutes until the salmon’s thickest portion is almost cooked through.
- While the salmon is baking, prep the vegetables for the salad dressing: chop your dill, parsley, celery and scallions and set aside.
- In a large bowl, combine the mayonnaise, Dijon mustard, lemon juice, paprika, cayenne pepper, salt, pepper and pinch of raw sugar. Mix well. Fold in all of the vegetables and herbs.
- Remove the skin from the cooked and slightly cooled salmon and place it in a medium-sized bowl. Using two forks, gently flake the fish, then add to the larger bowl of dressing. Mix until all of the salmon, herbs, veggies and sauce are fully incorporated.
- Give it a taste, adjust the seasonings to your liking and chill in the refrigerator for at least 30 minutes.
Back Story:

Unless you’re one of the 1,700 people who call Cassopolis, MI, home, you’re probably asking yourself, “Where is Stone Lake?” It’s tucked quietly away in the southwestern corner of Michigan, along with Diamond Lake, Paradise Lake (Vandalia), Bair Lake (Jones) and several others. Summers in Cass offer a peaceful retreat of small-town living: waving neighbors, tubing on the lake, movies on the deck, fresh vegetables from the farmer’s markets and darker night skies with brighter stars.
And after a day of playing in the sun, you want something easy but tasty to eat, which is typically one of two types of meals: BBQ or an assortment of simple salads and fresh fruit. Though my chicken salad is a staple in warmer months, a couple of family members became pescatarians last year and were visiting with us for the weekend in Michigan, so I needed a seafood salad to round out the lunchtime offerings. Hence, Stone Lake Salmon Salad. Given the scraped-clean serving bowl left on the kitchen island, I would dare say we’ll be adding this to our simple salad rotation. Hope it’ll land on your list, too.


SHARE THIS RECIPE

Park City Rosemary Garlic Popcorn
Rosemary, garlic and popcorn? Hmmm. Not too sure about that one. I thought the same thing when I first heard the combination. But let me tell you: don’t judge a kernel by its color or flavor profile before you’ve tried it.
PHOTO CREDIT: Dontrey Britt-Hart
Instructions:
½ cup popcorn kernels
3 tablespoons canola oil*
¼ cup extra virgin olive oil
1 tablespoon unsalted butter
1 ½ teaspoon finely chopped fresh rosemary
1 tablespoon minced garlic
¼ teaspoon fine sea salt
1. Heat olive oil and garlic in small saucepan over medium-low heat for approximately 2 minutes. Watch it to ensure the garlic is softening, but not browning. Stir once or twice. Reduce the heat to low and add the rosemary and simmer for 2 more minutes. Remove from heat, stir in butter and set aside.
2. Pop the popcorn according to the label’s directions. It will likely call for 3 tablespoons of *canola, avocado or coconut oil and ½ cup of popcorn kernels.
3. Pour the popped popcorn into a large bowl, drizzle with the rosemary garlic oil to taste (you don’t have to use all of it), and stir to coat. Finish with the sea salt and toss again. The only thing left is the crunching. (Be sure to grab a napkin.)
My Two Cents:
While my family loves this popcorn as is, you can take it to the next level by adding a shake or two of grated Parmesan.
Not only does this elevate movie night, but it’s a great pre-dinner snack when entertaining.
Park City Rosemary Garlic Popcorn

Ingredients
Instructions
- Heat olive oil and garlic in small saucepan over medium-low heat for approximately 2 minutes. Watch it to ensure the garlic is softening, but not browning. Stir once or twice. Reduce the heat to low and add the rosemary and simmer for 2 more minutes. Remove from heat, stir in butter and set aside.
- Pop the popcorn according to the label’s directions. It will likely call for 3 tablespoons of *canola, avocado or coconut oil and ½ cup of popcorn kernels.
- Pour the popped popcorn into a large bowl, drizzle with the rosemary garlic oil to taste (you don’t have to use all of it), and stir to coat. Finish with the sea salt and toss again. The only thing left is the crunching. (Be sure to grab a napkin.)
Back Story:
Rosemary, garlic and popcorn? Hmmm. Not too sure about that one. I thought the same thing when I first heard the combination. But let me tell you: don’t judge a kernel by its color or flavor profile before you’ve tried it.
We’ve been taking the boys to Park City, Utah, to ski since they were itty bitty and third on their must-have list only to hot cocoa and S’mores was the St. Regis’s signature snack of rosemary garlic popcorn. We would munch it by the handfuls while we waited for our main courses in the hotel restaurant.
Full disclaimer: this is NOT the St. Regis recipe. In fact, I don’t even know all of the ingredients used in their savory mix. What I do know is that after several trials in our kitchen, my test group over here marked this recipe with their stamp of approval and when they closed their eyes, they could’ve sworn they were wearing ski pants.
SHARE THIS RECIPE

Molten Lava Chocolate Cakes
Butter is rich; sugar is sweet. Add some chocolate and some spice to whip up this decadent treat.

Photo credit: Dontrey Britt-Hart
Instructions:
1. Preheat the oven to 450°. Butter and lightly flour four 6-ounce ramekins. Tap out the excess flour. You may also use baking spray in place of the butter and flour to lightly cover the insides. Set the ramekins on a baking sheet.
2. In a double boiler, over simmering water, melt the butter with the chocolate. In a medium bowl or standing mixer, beat the eggs with the egg yolks, vanilla, sugar, salt, cinnamon and cayenne pepper at a high speed until thickened and pale.
3. Whisk the chocolate until smooth, then fold it into the egg mixture along with the flour. Spoon the batter into the prepared ramekins and bake for 12 minutes, or until the sides of the cakes are firm but the centers are softly set. Let the cakes cool in the ramekins for 1 minute, then cover each with an inverted dessert plate. Carefully turn each one over, let stand for 10 seconds and then unmold. Serve immediately and dig in to enjoy the ooey gooey goodness.
1 stick (4 oz.) unsalted butter
6 oz. bittersweet chocolate
2 eggs
2 egg yolks
¼ cup sugar
¼ teaspoon of cinnamon
¼ teaspoon of salt
Pinch of cayenne pepper
Splash of vanilla extract
2 tablespoons all-purpose flour
Powdered sugar for sprinkling (optional)


My Two Cents:
The batter can be made ahead and refrigerated for several hours; just be sure to bring it to room temperature before baking.
Molten chocolate cakes are simple, but impressive desserts for dinner parties, date nights and any occasion you want to make special.
While these ramekins of yumminess are indulgent alone, they’re even better with my homemade whipped cream (remember, it’s super easy) or vanilla ice cream. I’m just saying . . .
Molten Lava Chocolate Cakes

Ingredients
Instructions
- Preheat the oven to 450°. Butter and lightly flour four ounce ramekins. Tap out the excess flour. You may also use baking spray in place of the butter and flour to lightly cover the insides. Set the ramekins on a baking sheet.
- In a double boiler, over simmering water, melt the butter with the chocolate. In a medium bowl or standing mixer, beat the eggs with the egg yolks, vanilla, sugar, salt, cinnamon and cayenne pepper at a high speed until thickened and pale.
- Whisk the chocolate until smooth, then fold it into the egg mixture along with the flour. Spoon the batter into the prepared ramekins and bake for 12 minutes, or until the sides of the cakes are firm but the centers are softly set. Let the cakes cool in the ramekins for 1 minute, then cover each with an inverted dessert plate. Carefully turn each one over, let stand for 10 seconds and then unmold. Serve immediately and dig in to enjoy the ooey gooey goodness.

Oven Roasted Brussel Sprouts Medley
The Brussel sprouts should have a slight char around the edges, which gives this dish a deliciously roasted crunch that pairs beautifully with the sweet acidity of the balsamic vinegar. Enjoy every yummy bite.

Photo Credit: Dontrey Britt-Hart
Instructions:
Preheat the oven to 400° F and line two large baking sheets with parchment paper.
Prepare Brussel sprouts, carrots, red bell pepper and onion according to the ingredients section’s directions.
Place all of the vegetables in a large mixing bowl and coat with approximately ¼ cup olive oil, salt, pepper and red pepper flakes. Toss well with a large spoon until fully covered.
Divide vegetable mixture evenly between both baking sheets in a single layer. Avoid overcrowding the vegetables. You want them to roast rather than steam.
Roast for about 35 minutes, then drizzle the vegetables with balsamic vinegar. Return to the oven for 5 – 7 additional minutes.
Lightly toss the vegetables around in the pan juices to thoroughly coat them before serving.
Olive oil
Balsamic vinegar
1 ½ lbs. (24 oz.) Brussel sprouts, trimmed and quartered
4 large carrots, peeled and cut into diagonal slices
1 large red bell pepper, coarsely chopped
1 large sweet onion, coarsely chopped
1 tablespoon Kosher salt
1 teaspoon coarsely ground pepper
1 teaspoon crushed red pepper flakes
Feel free to decrease the amount of red pepper flakes if you are spice averse
My Two Cents:
The Brussel sprouts should have a slight char around the edges, which gives this dish a deliciously roasted crunch that pairs beautifully with the sweet acidity of the balsamic vinegar. Enjoy every yummy bite.


Oven Roasted Brussel Sprouts Medley

Ingredients
Instructions
- Preheat the oven to 400° F and line two large baking sheets with parchment paper.
- Prepare Brussel sprouts, carrots, red bell pepper and onion according to the ingredients section’s directions.
- Place all of the vegetables in a large mixing bowl and coat with approximately ¼ cup olive oil, salt, pepper and red pepper flakes. Toss well with a large spoon until fully covered.
- Divide vegetable mixture evenly between both baking sheets in a single layer. Avoid overcrowding the vegetables. You want them to roast rather than steam.
- Roast for about 35 minutes, then drizzle the vegetables with balsamic vinegar. Return to the oven for 5 – 7 additional minutes.
- Lightly toss the vegetables around in the pan juices to thoroughly coat them before serving.

Trey's Jammin' Curry Chicken
This is the perfect meal to pair with the Denim & Damask reggae playlist. So, hit play, grab a ginger beer* and take a mental vacation to Jamaica. ‘Everyting’ is Irie, Mon!

PHOTO CREDIT: Dontrey Britt-Hart
Instructions:
In a large bowl or on a sheet pan, season the chicken with a light coating of garlic powder, coarse black pepper and seasoning salt. Cover and chill in the refrigerator while you prep your vegetables according to the ingredients section's directions, approximately 20 minutes. (Please use caution if you choose to use Scotch bonnet or jalapeño peppers. Consider wearing food prep gloves and do not touch your eyes. Trust me, you’ll regret it if you do.)
Place a large Dutch oven over medium heat and add enough olive oil to cover the bottom of the pot. In small batches, brown the chicken on both sides until the skin is crispy and golden brown, approximately 8 – 10 minutes per side. The chicken will not and should not be fully cooked.
Set the browned pieces of chicken aside on a large platter or sheet pan while you continue to sear the remaining batches.
Once you have prepared all of the chicken and removed it from the Dutch oven, add the onions, celery and potatoes to the pot over medium heat for 3 – 5 minutes. If the vegetables start to stick to the pot, drizzle a touch of olive oil over them, stir and adjust your flame. After 3 minutes, add the garlic, ginger, peppers, curry powder, turmeric, thyme and 1 teaspoon of Kosher salt. The vegetable/ spice mix will resemble a thick paste.
Add all of the chicken broth to the pot and stir gently to blend the spices. Cover and simmer while you prepare to add the chicken.
Using a large knife or cleaver, chop the chicken breasts into thirds. (It works much better to hold your knife or cleaver in place and apply the pressure of your body weight to break through the bones rather than hack away at the chicken.) The chicken thighs and wings will be added whole.
Return the seared chicken to the pot of simmering broth, including any pan drippings (that’s added flavor) and top with bay leaves. Cover and simmer 40 -45 minutes.
At this point, the dish will have a rich, spicy flavor, but you will need to add salt to your taste to balance the intense flavors of the curry.
Once the seasoning profile is to your liking, the last step is to stir in a small amount of cornstarch slurry. Mix 1 ½ tablespoons of cornstarch with 2 tablespoons of cold water in a small cup until you have a smooth liquid. Evenly distribute the slurry into the broth and stir gently to ensure it incorporates well. The beauty of using cornstarch to thicken broths is the control it allows and the light, silky sheen it gives to the sauce.
Simmer a few more minutes, serve over rice and garnish with a sprinkle of sliced scallions.
Olive oil
2 bone-in, skin-on chicken breasts
1.5 lbs. (5 – 6) chicken thighs, bone-in, skin on
3 lbs. chicken wings
8 cups chicken broth
1 large Vidalia or yellow onion, chopped
4 – 5 cloves of garlic, chopped
3 stalks of celery, chopped
3 Yukon gold potatoes, peeled and diced
2 teaspoons fresh ginger, peeled and grated
1 Scotch bonnet or jalapeño pepper (optional), seeded and chopped
2 stalks of scallions, sliced in rounds
2 – 3 bay leaves
Thyme, fresh or dried
Kosher salt
Seasoning salt
Coarsely ground black pepper
Yellow curry powder
Turmeric powder
Corn starch
My Two Cents:
Sautéed cabbage with carrots and onions or coleslaw is a jammin’ side dish.
This is the perfect time to hit play on the Denim & Damask reggae playlist, grab a ginger beer* and take a mental vacation to Jamaica. ‘Everyting’ is Irie, Mon!
* For those of you who have never tried ginger beer, it is non-alcoholic, so everyone in the family can get in on the action. Be warned that the ginger flavor can pack a strong punch.


Trey's Jammin' Curry Chicken

Ingredients
Instructions
- In a large bowl or on a sheet pan, season the chicken with a light coating of garlic powder, coarse black pepper and seasoning salt. Cover and chill in the refrigerator while you prep your vegetables according to the ingredients section's directions, approximately 20 minutes. (Please use caution if you choose to use Scotch bonnet or jalapeño peppers. Consider wearing food prep gloves and do not touch your eyes. Trust me, you’ll regret it if you do.)
- Place a large Dutch oven over medium heat and add enough olive oil to cover the bottom of the pot. In small batches, brown the chicken on both sides until the skin is crispy and golden brown, approximately 8 – 10 minutes per side. The chicken will not and should not be fully cooked.
- Set the browned pieces of chicken aside on a large platter or sheet pan while you continue to sear the remaining batches.
- Once you have prepared all of the chicken and removed it from the Dutch oven, add the onions, celery and potatoes to the pot over medium heat for 3 – 5 minutes. If the vegetables start to stick to the pot, drizzle a touch of olive oil over them, stir and adjust your flame. After 3 minutes, add the garlic, ginger, peppers, curry powder, turmeric, thyme and 1 teaspoon of Kosher salt. The vegetable/ spice mix will resemble a thick paste.
- Add all of the chicken broth to the pot and stir gently to blend the spices. Cover and simmer while you prepare to add the chicken.
- Using a large knife or cleaver, chop the chicken breasts into thirds. (It works much better to hold your knife or cleaver in place and apply the pressure of your body weight to break through the bones rather than hack away at the chicken.) The chicken thighs and wings will be added whole.
- Return the seared chicken to the pot of simmering broth, including any pan drippings (that’s added flavor) and top with bay leaves. Cover and simmer 40 -45 minutes.
- At this point, the dish will have a rich, spicy flavor, but you will need to add salt to your taste to balance the intense flavors of the curry.
- Once the seasoning profile is to your liking, the last step is to stir in a small amount of cornstarch slurry. Mix 1 ½ tablespoons of cornstarch with 2 tablespoons of cold water in a small cup until you have a smooth liquid. Evenly distribute the slurry into the broth and stir gently to ensure it incorporates well. The beauty of using cornstarch to thicken broths is the control it allows and the light, silky sheen it gives to the sauce.
- Simmer a few more minutes, serve over rice and garnish with a sprinkle of sliced scallions.

Easy Like Sunday Morning
Our collective aspiration is to reclaim at least one morning of our weekend to be easy, relaxing, and centered in peace.
By Dontrey Britt-Hart
“Ooh, that's why I'm easy
I'm easy like Sunday morning
That's why I'm easy
I'm easy like Sunday morning!”
— Commodores, “Easy”
Raise your hands if a relaxing weekend morning sounds good. After a long week of work, meetings, completing to-do lists and adulting, it’s safe to say that we could all use a mental health break mixed with a heaping teaspoon of self-care and a side of something tasty to enjoy. I’ve got you covered on all three.
Take a minute to listen to the first few bars of Easy. Just hearing those four words – Easy Like Sunday Morning – takes me back to childhood and sleepy starts on the weekend: music by the Commodores, the O’Jays, Nancy Wilson and Billie Holiday echoing from the living room to the kitchen where my mom chopped, stirred, whisked and transformed whatever she found in the refrigerator into a feast. There were eggs seasoned with spices and scrambled with cheese, English muffins toasted and topped with jam or cinnamon rolls iced with glaze, ruby red grapefruit halves or peaches with cottage cheese, grits or rice, and something savory sizzling in the skillet. The scent of bleach and Pine-Sol lingered from the mopped floors and scrubbed sinks that were tackled before and between dishes.
As a mom of three now myself, I fully accept that there was absolutely nothing easy about my mother’s morning, and, truth be told, it was definitely not a Sunday, because the music blaring from the speakers would have been The Clark Sisters, Shirley Caesar and gospel-singing Aretha; we’d be having a quick bowl of cereal or toast; and my mom would be scrambling to get three children bathed, brushed and shined up for church (yes, the grooming experience included a nice facial rubdown of good ol’ Vaseline).
But in my imagination . . . let’s rephrase that: our collective aspiration is to reclaim at least one morning of our weekend to be easy, relaxing and centered in peace. The Commodore’s song seemed, at the time, to be the perfect anthem for this post until I focused on the lyrics beyond the chorus: it’s a break-up song. But you know what? We’re claiming the parts of the message that we want: Easy Like Sunday Morning.
So, here’s this week’s assignment for the weekend: put on your good pajamas, pull out the good dishes and treat yourself to an easy, but satisfying brunch right from the comfort of your home. (*We’ll talk about enjoying the good stuff in an upcoming post.)
I’ve pulled together a super simple brunch menu that will keep the easy-breezy in your morning without sacrificing the magic my mom used to make. After your meal, relax. Spend some “disconnected” time connecting with your loved ones. Be still. Chillax & take it easy.
Easy Like Sunday Morning Brunch Menu:
- Whipped Berry Yogurt Parfait
- Simple green salad
- Whole wheat toast or English muffins
- Tea, coffee or juice


Whipped Berry Yogurt Parfait
Layers of lusciousness upgrade your everyday cup of yogurt from ho-hum to yum with homemade whipped cream, fresh fruit and crunchy granola. You’ll be scraping the bottom of your glass to get every creamy bite.

PHOTO CREDIT: Dontrey Britt-Hart
Instructions:
1. In 4 glasses, layer a small handful of blueberries and diced strawberries on the bottom of the glasses.
2. Follow with half a container of yogurt, followed by a dollop of whipped cream and a sprinkling of granola. Repeat layers, adding sliced strawberries around the perimeter of the glass for visual appeal.
3. Finish with a small dollop of whipped cream on the top and garnish with a few blueberries and a whole strawberry on the edge of your glass.
1 cup fresh whipped cream (see recipe in instructions)
4 5.3-oz. containers of strawberry or vanilla Greek yogurt
1 cup of granola, my personal favorite is milk & honey original café mix
1 cup of strawberries, ¾ diced and ¼ sliced
4 whole strawberries, sliced partially from the bottom for garnish
1 cup of blueberries
My Two Cents:
This simple recipe is all about assembling and no cooking, aside from whipping up your fresh whipped cream, which can be done in advance.
Layers of lusciousness upgrade your everyday cup of yogurt from ho-hum to yum with homemade whipped cream, fresh fruit and crunchy granola. You’ll be scraping the bottom of your glass to get every creamy bite.
Whipped Berry Yogurt Parfait

Ingredients
Instructions
- In 4 glasses, layer a small handful of blueberries and diced strawberries on the bottom of the glasses.
- Follow with half a container of yogurt, followed by a dollop of whipped creamand a sprinkling of granola. Repeat layers, adding sliced strawberries around the perimeter of the glass for visual appeal.
- Finish with a small dollop of whipped cream on the top and garnish with a few blueberries and a whole strawberry on the edge of your glass.


Fresh Whipped Cream
With a few everyday ingredients, you can whip up fresh whipped cream that rivals anything you can buy in a can.

PHOTO CREDIT: Dontrey Britt-Hart
Instructions:
1. Add whipping cream, sugar and vanilla to a mixing bowl or stand mixer with the whisk attachment. On medium-low speed, whisk the ingredients until it begins to thicken, about 2 minutes.
2. Increase the speed to high and beat for another 2 to 3 minutes, until soft peaks begin to form.
3. Be careful not to overmix the cream, because it will become like butter.
1 cup heavy whipping cream, chilled >
3 teaspoons powdered sugar
½ teaspoon pure vanilla extract
My Two Cents:
We keep a small glass container of this whipped goodness in our refrigerator to add a layer of lusciousness to hot chocolate, coffee drinks, waffles, yogurt parfaits, ice cream or baked desserts.
Hand whisking is not recommended for this dish, unless you’re going for an ultra-arm workout.
Fresh Whipped Cream

Ingredients
Instructions
- Add whipping cream, sugar and vanilla to a mixing bowl or stand mixer with the whisk attachment. On medium-low speed, whisk the ingredients until it begins to thicken, about 2 minutes.
- Increase the speed to high and beat for another 2 to 3 minutes, until soft peaks begin to form.
- Be careful not to overmix the cream, because it will become like butter.


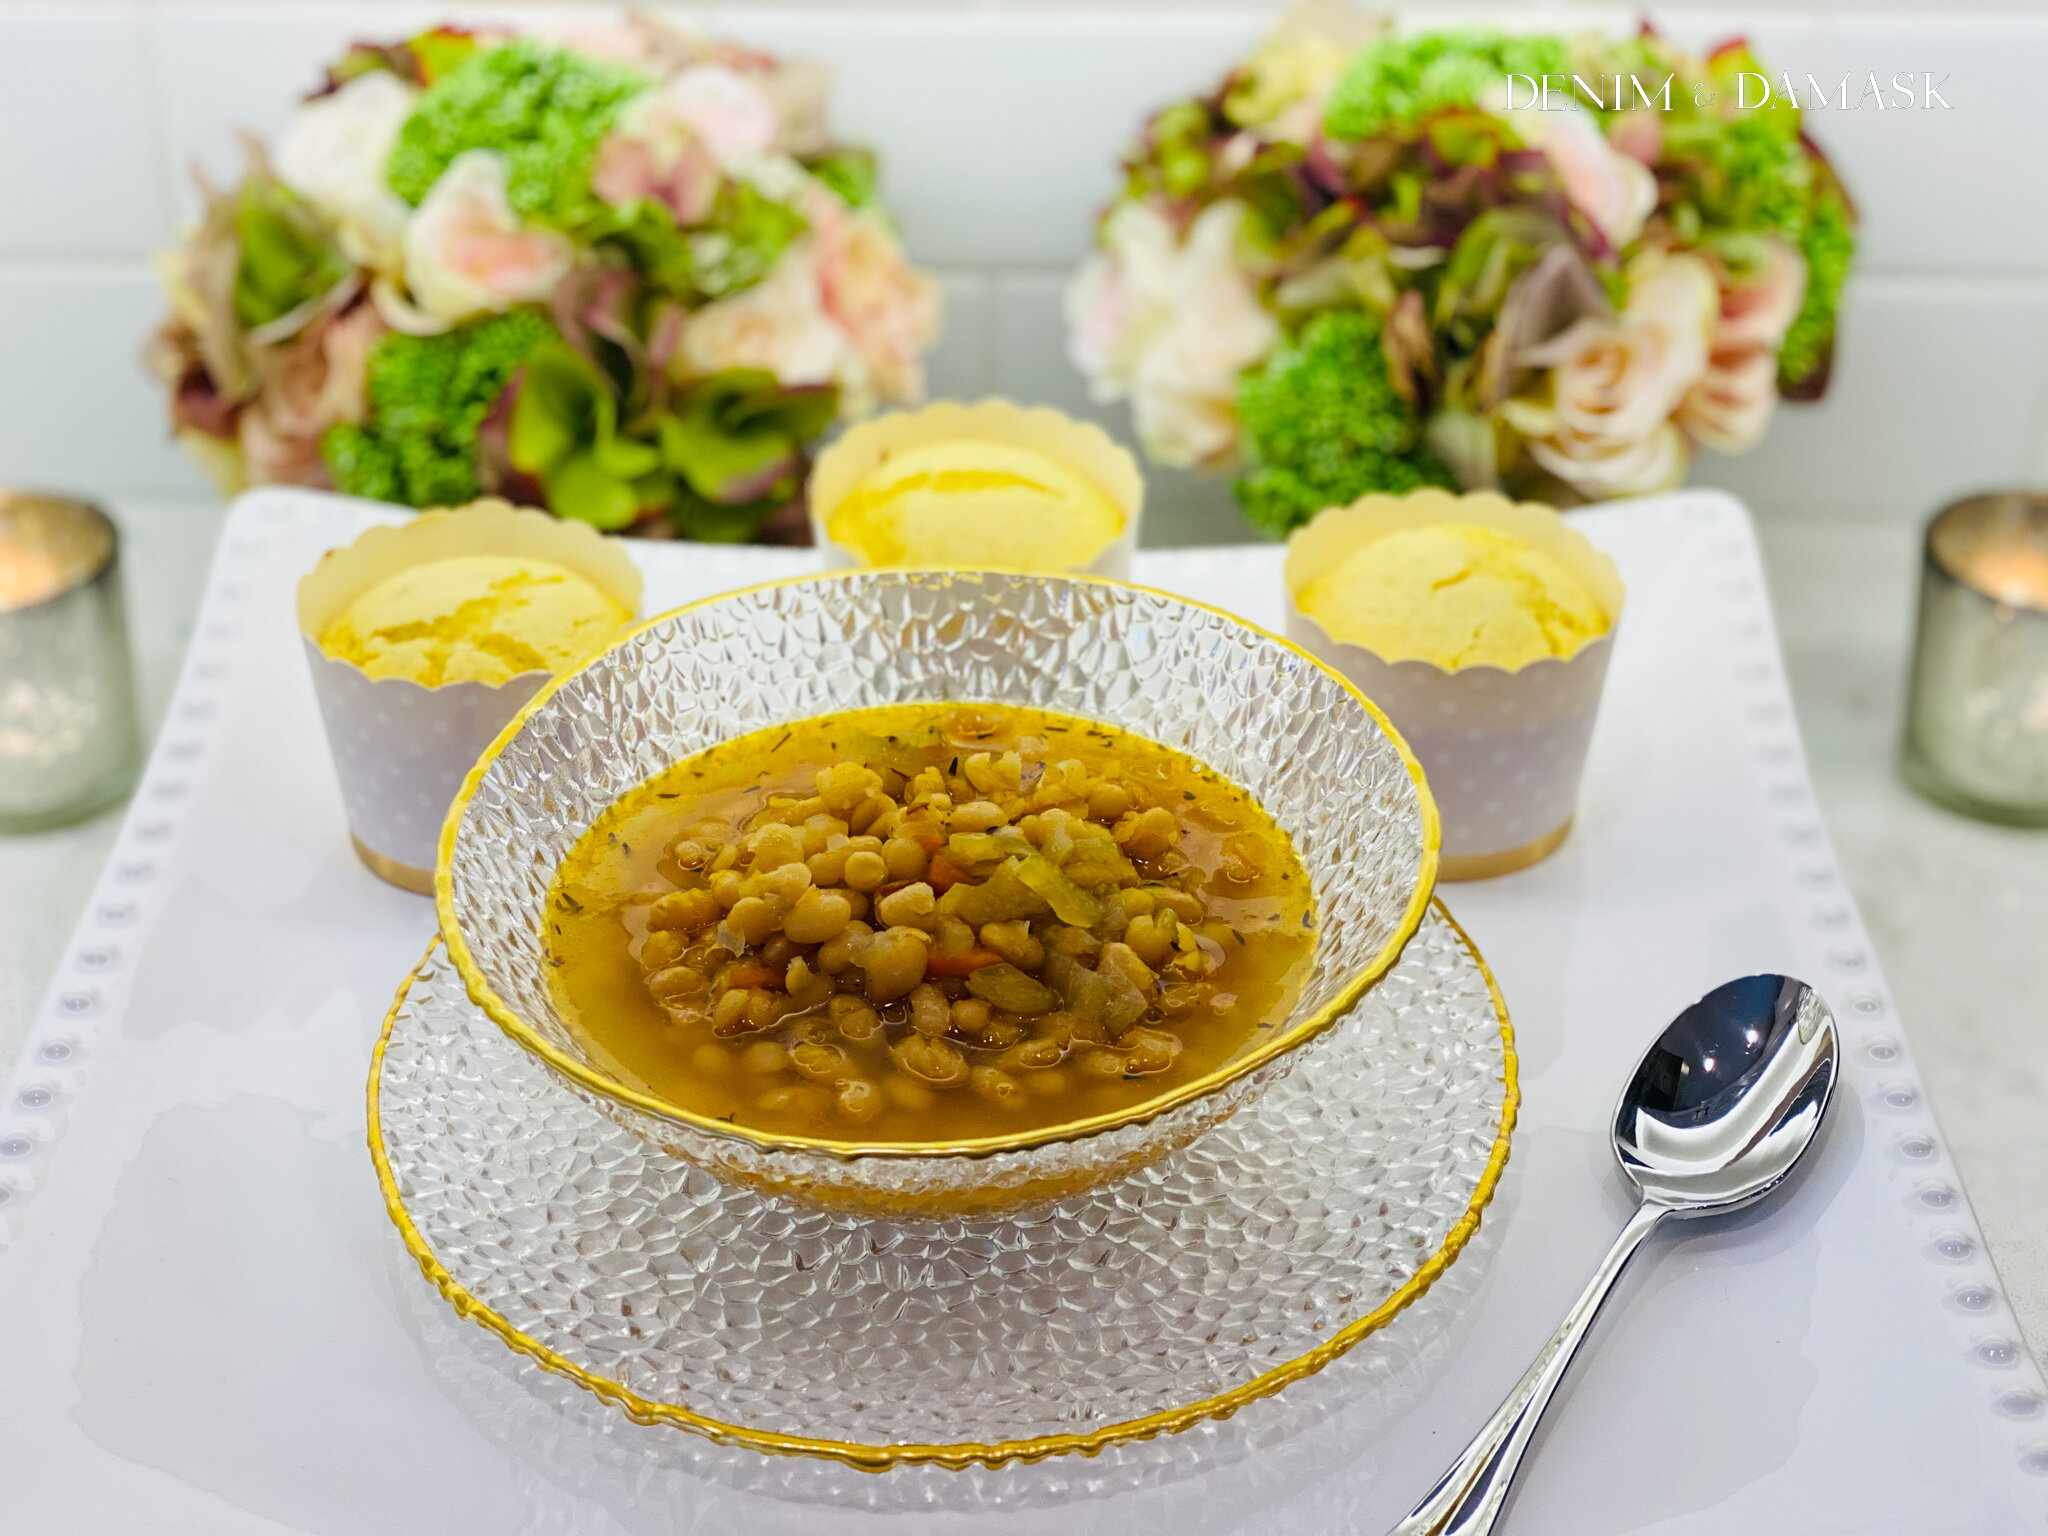
White Bean Soup Recipe
“Fish don't fry in the kitchenBeans don't burn on the grillTook a whole lotta tryin'Just to get up that hill”
— The Jeffersons Theme Song
Beans and cornbread are movin’ on up with this elevated White Bean Soup recipe. With the right love and care, you can make an everyday dish something to smile about.

Photo credit: Dontrey Britt-Hart
Instructions:
Place a large Dutch oven over medium heat and drizzle enough olive oil to cover the bottom of the pot. Add your chopped onions, celery, and carrots and sauté over medium-low heat until onions are slightly translucent. Stir occasionally to prevent browning. Add garlic and your portions of smoked turkey, if using, and sauté a few minutes longer.
Sprinkle crushed red pepper flakes over the vegetables and stir. (*If you are spice-averse, use your best judgment on the amount of pepper used. We like spice in our family, so I sometimes add a pinch more.)
Pour 2 quarts of chicken or vegetable broth into the pot and most of your water, cover, and simmer for 10 – 15 minutes. (*I like the flavor chicken broth imparts to the beans, but I’m sure vegetable broth would be tasty for those who do not eat meat. Any broth will give your soup better flavor than water alone.)
Add beans, thyme and bay leaves. Cover and simmer for about an hour. Stir occasionally.
Add smoked paprika, garlic powder, salt and pepper.
Continue to simmer until beans are tender, approximately another hour and a half.
Add additional salt and pepper to taste (I always add a bit more) and enjoy every spoonful.
Olive oil
2 lbs. (32 oz.) small white beans, sorted and rinsed
2 small or 1 large sweet onion(s), chopped
3 – 4 stalks of celery, diced
2 large carrots, peeled and chopped
2 – 3 cloves of garlic, peeled and diced
2 quarts (64 oz.) chicken or vegetable broth
1 quart (32 oz.) water
2 small portions of smoked turkey, scored (optional)
¼ teaspoon crushed red pepper flakes
3 teaspoons dried thyme
2 – 3 bay leaves
1 teaspoon smoked paprika
2 teaspoons coarse Kosher salt
1 teaspoon coarsely ground black pepper


My Two Cents:
The guys sometimes enjoy a small scoop of rice in their white bean soup.
For those who want a bit more protein, you can remove the smoked turkey, shred it with a fork and return it to your soup.
A simple green salad with a vinaigrette is a bright side dish that compliments the soup’s warm heartiness.
And, if you’re not counting carbs, a fluffy cornbread muffin or crisp slice of garlic parmesan toast is a tasty side dish to soak up the last bits of the savory broth.
White Bean Soup Recipe

Ingredients
Instructions
- Place a large Dutch oven over medium heat and drizzle enough olive oil to cover the bottom of the pot. Add your chopped onions, celery, and carrots and sauté over medium-low heat until onions are slightly translucent. Stir occasionally to prevent browning. Add garlic and your portions of smoked turkey, if using, and sauté a few minutes longer.
- Sprinkle crushed red pepper flakes over the vegetables and stir. (*If you are spice-averse, use your best judgment on the amount of pepper used. We like spice in our family, so I sometimes add a pinch more.)
- Pour 2 quarts of chicken or vegetable broth into the pot and most of your water, cover, and simmer for 10 – 15 minutes. (*I like the flavor chicken broth imparts to the beans, but I’m sure vegetable broth would be tasty for those who do not eat meat. Any broth will give your soup better flavor than water alone.)
- Add beans, thyme and bay leaves. Cover and simmer for about an hour. Stir occasionally.
- Add smoked paprika, garlic powder, salt and pepper.
- Continue to simmer until beans are tender, approximately another hour and a half.
- Add additional salt and pepper to taste (I always add a bit more) and enjoy every spoonful.

Lemon Blueberry Scones
These scones are subtly sweet, so if you had a dessert in mind, you might want to sprinkle the tops with sugar before baking or finish them with a simple glaze. I personally enjoy them the way they are, but I have iced them for my sweet-tooth friends.

Photo credit: Dontrey Britt-Hart
Instructions:
Preheat the oven to 400°F. Line baking sheet with parchment paper. Sift flour, sugar, baking powder, salt and baking soda into a large bowl. Mix in lemon peel.
Add butter and rub in with fingertips until mixture resembles coarse meal. Gradually add buttermilk and vanilla, tossing with fork until moist clumps form.
Gently fold in blueberries.
Turn dough out onto lightly floured work surface. Knead briefly to bind dough, about 4 turns. Form dough into 1-inch-thick round. Cut into 8 wedges.
Transfer the wedges to the prepared baking sheet, spacing 2 inches apart.
Bake until the tops of the scones are golden brown, about 25 minutes.
Let stand on the baking sheet for 10 minutes. Serve scones warm or at room temperature.
Makes 8.
3 cups all-purpose flour
1/3 cup sugar
2 1/2 teaspoons baking powder
1 teaspoon salt
1/2 teaspoon baking soda
2 tablespoons grated lemon peel
3/4 cup (1 1/2 sticks) chilled unsalted butter, cut into 1/2-inch pieces
3/4 cup fresh blueberries
1 cup chilled buttermilk
Dash of vanilla


My Two Cents:
These scones are subtly sweet, so if you had a dessert in mind, you might want to sprinkle the tops with sugar before baking or finish them with a simple glaze. I personally enjoy them the way they are, but I have iced them for my sweet-tooth friends.
Simple lemon glaze: ¼ cup freshly squeezed lemon juice, 1 cup confectioners’ sugar, sifted, ½ tablespoon unsalted butter, finely grated zest of ½ lemon. Mix lemon juice and confectioners’ sugar over low heat in a small pot or double boiler. Add butter and lemon zest and whisk until smooth. Drizzle over the scones until you’re happy.
Lemon Blueberry Scones

Ingredients
Instructions
- Preheat the oven to 400°F. Line baking sheet with parchment paper. Sift flour, sugar, baking powder, salt and baking soda into a large bowl. Mix in lemon peel.
- Add butter and rub in with fingertips until mixture resembles coarse meal. Gradually add buttermilk and vanilla, tossing with fork until moist clumps form.
- Gently fold in blueberries.
- Turn dough out onto lightly floured work surface. Knead briefly to bind dough, about 4 turns. Form dough into 1-inch-thick round. Cut into 8 wedges.
- Transfer the wedges to the prepared baking sheet, spacing 2 inches apart.
- Bake until the tops of the scones are golden brown, about 25 minutes.
- Let stand on the baking sheet for 10 minutes. Serve scones warm or at room temperature.