
Slice of Sunshine Key Lime Pie
There’s just something about the combination of the tart and creamy lime filling, the pillowy fresh whipped cream, and the buttery Graham cracker crust that is pure summer deliciousness. Ahh, tastes like sunshine.

photo credit: dontrey britt-Hart
5 egg yolks
1 (14-ounce) can sweetened condensed milk
½ cup key lime juice
9-inch Graham cracker crust, homemade or store-bought (no judgment)
Instructions:
Preheat the oven to 375°F.
Combine the egg yolks, sweetened condensed milk, and key lime juice in a large bowl and mix well.
Pour the mixture into the Graham cracker crust.
Bake for 15 minutes, until the filling is set.
Cool to room temperature, then refrigerate for at least two hours before slicing.
Enjoy as is or top with fresh whipped cream and a zest of lime.
Sweet & Tart


My Two Cents:
There’s just something about the combination of the tart and creamy lime filling, the pillowy fresh whipped cream, and the buttery Graham cracker crust that is pure summer deliciousness. Ahh, tastes like sunshine.
If you cannot find key limes, a good substitute is to use a 1:1 mixture of fresh lime juice and lemon juice.
For a simple, foolproof homemade Graham cracker crust, all you need are an additional 15 minutes and three ingredients: 1 1/2 cups of Graham cracker crumbs, 1/3 cup of granulated sugar, and six tablespoons of melted butter.
Preheat the oven to 350°F.
Mix the Graham cracker crumbs, sugar, and melted butter in a bowl.
Pour the crumb mixture into a 9-inch pie pan and use the back of a measuring spoon or the bottom of a glass to press it firmly to the bottom and up the sides of the pan.
Bake for 10 minutes. Remove from the oven and cool before filling with the key lime batter.
Easy peasy and so worth the extra time.

Slice of Sunshine Key Lime Pie
There’s just something about the combination of the tart and creamy lime filling, the pillowy fresh whipped cream, and the buttery Graham cracker crust that is pure summer deliciousness. Ahh, tastes like sunshine.
Ingredients
Instructions
- Preheat the oven to 375°F.
- Combine the egg yolks, sweetened condensed milk, and key lime juice in a large bowl and mix well.
- Pour the mixture into the Graham cracker crust.
- Bake for 15 minutes, until the filling is set.
- Cool to room temperature, then refrigerate for at least two hours before slicing.
- Enjoy as is or top with fresh whipped cream and a zest of lime.
Notes
- If you cannot find key limes, a good substitute is to use a 1:1 mixture of fresh lime juice and lemon juice.
- For a simple, foolproof homemade Graham cracker crust, all you need are an additional 15 minutes and three ingredients: 1 1/2 cups of Graham cracker crumbs, 1/3 cup of granulated sugar, and six tablespoons of melted butter.
- Preheat the oven to 350°F.
- Mix the Graham cracker crumbs, sugar, and melted butter in a bowl.
- Pour the crumb mixture into a 9-inch pie pan and use the back of a measuring spoon or the bottom of a glass to press it firmly to the bottom and up the sides of the pan.
- Bake for 10 minutes. Remove from the oven and cool before filling with the key lime batter.
- Easy peasy and so worth the extra time.
SHARE THIS RECIPE

Enero Seco (Dry January)
This refreshing, zero-proof drink is proof in a glass that Dry January can still pack a punch of flavor and fun. After one sip of this refreshing blend of cucumber, mint and lime, you’ll feel the sea mist of summer kissing your skin, even in the chill of winter.

photo credit:dontrey britt-Hart
12 cucumber slices, setting aside 4 slices for garnish
20 mint leaves, setting aside 4 leaves for garnish
4 oz. simple syrup (one part sugar dissolved in one part water)
3 oz. lime juice
Club soda or sparkling water, to top
Garnishes: fresh mint, cucumber slices, lime slices, Tajín
Instructions:
1. Combine the cucumber slices, mint leaves, simple syrup, and lime juice in a shaker and muddle well.
2. Shake or stir with a bar spoon, serve in a highball with ice, and top with club soda.
3. Garnish with fresh mint and lime or cucumber slices, and enjoy.
4. A Tajín rim takes it over the top (a must-include, in my opinion).
*Makes four refreshing servings.
My Two Cents:
Slightly sweet, fresh and zingy, Enero Seco (“Dry January” in Spanish) is one of my favorite mocktails that I frequently enjoy every month of the year.
After one sip of this refreshing blend of cucumber, mint and lime, you’ll feel the sea mist of summer kissing your skin, even in the chill of winter.


")
Enero Seco (Dry January)
Ingredients
Instructions
- Combine the cucumber slices, mint leaves, simple syrup, and lime juice in a shaker and muddle well.
- Shake or stir with a bar spoon, serve in a highball with ice, and top with club soda.
- Garnish with fresh mint and lime or cucumber slices, and enjoy.
- A Tajín rim takes it over the top (a must-include, in my opinion).
SHARE THIS RECIPE

D&D: Soulful Holiday 2024
Denim & Damask's Soulful Holiday playlist is the perfect mix of nostalgic classics and new school grooves to satisfy a variety of musical appetites.
Tree trimming with family, festive soirées, cozy nights in snuggled up with a hot cup of cocoa… this playlist applies and supplies the soundtrack.

Life’s most precious memories are interwoven with music. Just a few notes of a song and you’re transported back to your grandmother’s kitchen or the backseat of the family station wagon on a snowy road trip.
With that in mind, I dipped into my lyrical library for an early gift from Denim & Damask to you: the D&D Soulful Holiday playlist. IMO, it’s the perfect mix of nostalgic classics and new school grooves to satisfy a variety of musical appetites. Tree trimming with family, festive soirées, cozy nights in snuggled up with a hot cup of cocoa… this playlist applies and supplies the soundtrack.
So turn it up and tap into the sentimentality and soul.
Happiest of Happy Holidays to you and yours!
Xo,
DBH
P.S. Enjoy a few of my favorite Christmas memories with three of my favorite guys and the lessons I learned by tapping each photo ❤️.

believe in christmas magic.

Close your eyes & trust that wishes come true.

work hard to stay on the nice list.

Twinkling Cider Mocktail
With the brightness of apple cider and citrus, cinnamon's warm notes, and ginger ale's effervescence, this refreshing mocktail tickles your nose and warms your toes, pleasing kids and adults alike.
Seasonal flavors, family-friendly, and garnishes that speak to the season at hand… What’s not to love?!

photo credit:dontrey britt-Hart
8 ounces apple cider
2 ounces freshly squeezed orange juice
4 ounces ginger ale
1/8 teaspoon cinnamon
Garnishes: apple slices, orange slices, cinnamon sticks and star anise
Instructions:
1. Combine the apple cider, fresh orange juice, and cinnamon in a Boston shaker. Shake well, then divide the mixture between two coupe glasses.
2. Top each glass with 2 ounces of ginger ale.
3. Garnish with a cinnamon stick, star anise, and a round slice of apple or orange.
4. Clink your glasses and enjoy.
*Makes two twinkling servings.
My Two Cents:
The holidays can be a handful, so keeping a few simple, festive drink and appetizer recipes in your entertaining arsenal is a must.
This subtly sweet, effervescent mocktail pleases kids and adults alike. However, if any of your guests desire extra spirits to make their season bright, a splash of prosecco or rum pairs perfectly with the brightness of the cider and citrus and the warm notes of cinnamon.
Honey crisp apples and navel oranges are my personal faves to garnish this twinkling delight.


Twinkling Cider Mocktail
Ingredients
Instructions
- Combine the apple cider, fresh orange juice, and cinnamon in a Boston shaker. Shake well, then divide the mixture between two coupe glasses.
- Top each glass with 2 ounces of ginger ale.
- Garnish with a cinnamon stick, star anise, and a round slice of apple or orange.
- Clink your glasses and enjoy.
Notes
- The holidays can be a handful, so keeping a few simple, festive drink and appetizer recipes in your entertaining arsenal is a must.
- This subtly sweet, effervescent mocktail pleases kids and adults alike. However, if any of your guests desire extra spirits to make their season bright, a splash of prosecco or rum pairs perfectly with the brightness of the cider and citrus and the warm notes of cinnamon.
- Honey crisp apples and navel oranges are my personal faves to garnish this twinkling delight.
SHARE THIS RECIPE

The Great Pumpkin Bread
The warm, earthy notes of cinnamon, nutmeg, and cloves combined with the autumnal flavors of pumpkin transport you to that Great Pumpkin patch that Linus dreamed of. One bite will make you feel cozy, even on a chilly day.

Photo credit: Dontrey Britt-Hart
“Gee,I got a candy bar. Boy, I got three cookies. Hey, I gotta package of gum … I gotta rock.”
— CHARLIE BROWN & FRIENDS, IT’S THE GREAT PUMPKIN, CHARLIE BROWN (1966)
2 cups all-purpose flour
½ teaspoon salt
1 teaspoon baking soda
½ teaspoon baking powder
1 teaspoon ground cloves
1 teaspoon ground cinnamon
1 teaspoon ground nutmeg
1½ sticks (¾ cup) unsalted butter, softened
1 ½ cups sugar
2 large eggs
1 ½ teaspoons vanilla extract
1 (15-oz) can 100% pure pumpkin
Optional Cinnamon Glaze:
1 cup powdered sugar
2 tablespoons melted butter
3 tablespoons milk
½ teaspoon cinnamon
Pinch of salt
Instructions:
Preheat oven to 325°F. Butter and flour two 9 x 5-inch glass or metal loaf pans. Use baking spray with flour as a simple alternative.
Whisk or sift the flour, salt, baking soda, baking powder, cloves, cinnamon, and nutmeg in a medium bowl to blend. Set aside.
In a mixing bowl, beat butter with an electric mixer until fluffy. Gradually add sugar, beating until well blended. Add the eggs one at a time, mixing well after each addition. Continue beating until light and fluffy. Add the pumpkin and vanilla extract and mix well.
Add the flour mixture and mix it at low speed, being careful not to overmix.
Spoon the batter into the prepared pans, dividing evenly.
Bake bread until a tester inserted into the center comes out clean, about 65 – 75 minutes. I recommend starting to check your bread around the 55-minute timeframe. Allow the loaves to cool in the pans for about 10 minutes, then turn them out onto a wire baking rack to cool.
For the optional glaze, whisk together powdered sugar, vanilla, melted butter, milk, cinnamon, and a pinch of salt. Drizzle over warm bread and cool.
Makes two loaves.
Enjoy every spiced, yummy bite!
A taste of fall!
My Two Cents:
For entertaining, consider baking one extra-long loaf using the Wilton 16 x 4-inch aluminum pan. You’ll win extra points for presentation.
This spiced bread fills your home with the aromas of autumn – cinnamon, nutmeg, and cloves – and is a hit any time of year, especially from Halloween through Thanksgiving.
Our family and friends expect a freshly baked loaf of pumpkin bread and a carafe of Warm Spiced Cider every Halloween.


The Great Pumpkin Bread
Ingredients
Instructions
- Preheat oven to 325°F. Butter and flour two 9 x 5-inch glass or metal loaf pans. Use baking spray with flour as a simple alternative.
- Whisk or sift the flour, salt, baking soda, baking powder, cloves, cinnamon, and nutmeg in a medium bowl to blend. Set aside.
- In a mixing bowl, beat butter with an electric mixer until fluffy. Gradually add sugar, beating until well blended. Add the eggs one at a time, mixing well after each addition. Continue beating until light and fluffy. Add the pumpkin and vanilla extract and mix well.
- Add the flour mixture and mix it at low speed, being careful not to overmix.
- Spoon the batter into the prepared pans, dividing evenly.
- Bake bread until a tester inserted into the center comes out clean, about 65 – 75 minutes. I recommend starting to check your bread around the 55-minute timeframe. Allow the loaves to cool in the pans for about 10 minutes, then turn them out onto a wire baking rack to cool.
- For the optional glaze, whisk together powdered sugar, vanilla, melted butter, milk, cinnamon, and a pinch of salt. Drizzle over warm bread and cool.
- Makes two loaves.
- Enjoy every spiced, yummy bite!
Notes
My Two Cents:
- For entertaining, consider baking one extra-long loaf using the Wilton 16 x 4-inch aluminum pan. You’ll win extra points for presentation.
- This spiced bread fills your home with the aromas of autumn – cinnamon, nutmeg, and cloves – and is a hit any time of year, especially from Halloween through Thanksgiving.
- Our family and friends expect a freshly baked loaf of pumpkin bread and a carafe of Warm Spiced Cider every Halloween.
SHARE THIS RECIPE

Sabrosa Sparkling Limonada
This traditional Mexican drink made from limes, simple syrup, and sparkling water mentally transports me to one of our happy places—travel in Mexico. Savor it on the rocks with a sprig of mint and a slice of lime on the rim.

photo credit:dontrey britt-Hart
2 cups sparkling water
½ cup freshly squeezed lime juice
½ cup simple syrup*
Ice
Optional garnishes: Lime slices and fresh mint sprigs
Instructions:
1. To make the simple syrup, mix one cup of sugar with one cup of water in a small saucepan over a medium flame. Heat and stir until the sugar fully dissolves, but do not boil. Allow the syrup to cool to room temperature before using or storing. Transfer the simple syrup to a glass container. Store any unused syrup in the refrigerator for up to one month.
2. Combine the fresh lime juice and simple syrup in a pourable container. Stir well and keep chilled until ready to serve.
3. Add 2 ounces of the sweetened lime juice to a glass. You can adjust the sweetness of your limonada by increasing or decreasing the simple syrup to taste.
4. Slowly pour 4 ounces of sparkling water over the sweetened lime juice and stir gently.
5. Feel free to add your ice before or after preparation.
6. Garnish with a sprig of mint and a slice of lime on the rim.
*Makes four sparkly servings.
My Two Cents:
My boys and I first sipped this traditional citrusy refresher in Punta Mita over spring break more than ten years ago, and it has been a family favorite ever since.
If you want some extra bubble and fizz, try Topo Chico carbonated mineral water. It packs an effervescent punch that lasts until the very last drop.
As always, you can easily swap agave syrup for the simple syrup for a lower glucose intake.
Simple. Refreshing. Sabrosa.


Sabrosa Sparkling Limonada
Ingredients
Instructions
- To make the simple syrup, mix one cup of sugar with one cup of water in a small saucepan over a medium flame. Heat and stir until the sugar fully dissolves, but do not boil. Allow the syrup to cool to room temperature before using or storing. Transfer the simple syrup to a glass container. Store any unused syrup in the refrigerator for up to one month.
- Combine the fresh lime juice and simple syrup in a pourable container. Stir well and keep chilled until ready to serve.
- Add 2 ounces of the sweetened lime juice to a glass. You can adjust the sweetness of your limonada by increasing or decreasing the simple syrup to taste.
- Slowly pour 4 ounces of sparkling water over the sweetened lime juice and stir gently.
- Feel free to add your ice before or after preparation.
- Garnish with a sprig of mint and a slice of lime on the rim.
Notes
My Two Cents:
- My boys and I first sipped this traditional citrusy refresher in Punta Mita over spring break more than ten years ago, and it has been a family favorite ever since.
- If you want some extra bubble and fizz, try Topo Chico carbonated mineral water. It packs an effervescent punch that lasts until the very last drop.
- As always, you can easily swap agave syrup for the simple syrup for a lower glucose intake.
- Simple. Refreshing. Sabrosa.
SHARE THIS RECIPE

Triple Berry Trifle
My Triple Berry Trifle is a Hart family favorite and oh-so-easy to prep. Layers of fresh berries brightened with the zest of lemons, luscious cream, and either pound cake or angel food cake (depending on how decadent you want to be) bring the party (and the pop) to your dessert table.

photo credit:dontrey britt-Hart
1 cup raspberry jam
3 cups strawberries, sliced
3 cups blueberries
2 cups heavy whipping cream
16 ounces cream cheese, room temperature
1 ½ cups powdered sugar
1 teaspoon vanilla extract
2 teaspoons lemon zest, freshly grated
1 (8 oz) Angel food or pound cake
Fresh mint sprigs, optional garnish
Instructions:
1. Place the washed and prepped strawberries and blueberries into separate bowls.
2. Heat the raspberry jam in a small saucepan over low heat until warm and thinned, about 3 minutes. Add one teaspoon of lemon zest and stir.
3. Divide the warm jam between the two bowls of berries and stir lightly until coated. Set aside.
4. Whip the heavy cream in a large bowl or mixer with the whisk attachment until stiff peaks form. Set aside.
5. In a separate bowl, beat the softened cream cheese with the powdered sugar until smooth. Add one teaspoon of lemon zest and the vanilla extract and mix until blended. Whisk in a third of the whipped cream, then fold in the remaining whipped cream until well combined using a spatula.
6. Using one 14-cup capacity trifle dish or eight goblet glasses, cover the bottom of the dish or glasses with slices of cake. Follow with the strawberry mixture and the cream. Repeat the layering, alternating the blueberries with the strawberries and ending with the cream mixture.
7. Garnish with berries and a sprig of mint.
8. Chill for a few hours before indulging.
My Two Cents:
· My Triple Berry Trifle is a Hart family favorite and oh-so-easy to prep. For the cake base, you can choose either pound cake or angel food cake (depending on how decadent you want to be).
· For an extra punch of flavor, zest a bit of fresh lemon zest over the top before serving — and pow! Fireworks at your dessert table.


Triple Berry Trifle
Ingredients
Instructions
- Place the washed and prepped strawberries and blueberries into separate bowls.
- Heat the raspberry jam in a small saucepan over low heat until warm and thinned, about 3 minutes. Add one teaspoon of lemon zest and stir.
- Divide the warm jam between the two bowls of berries and stir lightly until coated. Set aside.
- Whip the heavy cream in a large bowl or mixer with the whisk attachment until stiff peaks form. Set aside.
- In a separate bowl, beat the softened cream cheese with the powdered sugar until smooth. Add one teaspoon of lemon zest and the vanilla extract and mix until blended. Whisk in a third of the whipped cream, then fold in the remaining whipped cream until well combined using a spatula.
- Using one 14-cup capacity trifle dish or eight goblet glasses, cover the bottom of the dish or glasses with slices of cake. Follow with the strawberry mixture and the cream. Repeat the layering, alternating the blueberries with the strawberries and ending with the cream mixture.
- Garnish with berries and a sprig of mint.
- Chill for a few hours before indulging.
Notes
My Two Cents:
For an extra punch of flavor, zest a bit of fresh lemon zest over the top before serving — and pow! Fireworks at your dessert table.
SHARE THIS RECIPE
Miraval Sweet-n-Savory Snack Mix
This crunchy, slightly sweet snack mix is uber-easy and sure to become one of your next not-so-guilty pleasures. Warning: This snack mix won’t last long.

photo credit:dontrey britt-Hart
2 cups hazelnuts
2 cups shelled pistachios
½ cup sunflower seeds
1/3 cup crispy shallots
1/3 cup fresh tarragon, chopped
1/3 cup fresh basil, chopped
1/3 cup fresh parsley, chopped
2 cups golden raisins
½ cup agave syrup
Flaked sea salt, optional
Instructions:
1. Mix all the above ingredients in a mixing bowl.
2. Add a pinch or two of flaked sea salt, if you’d like.
3. Pour onto a prepared baking sheet, ideally a nonstick baking mat or lightly oiled parchment paper.
4. Bake for 5 – 7 minutes in a 350° F oven.
5. Cool slightly and serve crumbled handfuls in small bowls. Warning: This snack mix will not last long.
My Two Cents:
- Miraval’s Cocktail in the Kitchen experience pairs refreshing cocktails and mocktails with tasty light bites prepared by its resident mixologists and chefs. My last class featured this crunchy, slightly sweet snack mix that is uber-easy and sure to become one of your next not-so-guilty pleasures.
Backstory:

Though I’m not a total teetotaler, I can often be found sipping alcohol-free bevs around town simply for the flavor. More nutrients, no hangovers, maximum hydration… They’re a feel-good way to celebrate and the entire family can partake.
During my recent stay at Miraval Arizona, the programming was all about leading a “Life in Balance” — in the spa, at the equine experiences, and even at the bar. In fact, the resort’s current Cocktails in the Kitchen experience is an immersive course on how to create a harmonious blend of sweet, sour, bitter and herbaceous sips guided by a proven ratio (and your creative choices). Let’s just say that the results were delicious — and copious notes were taken.
The short of it is this: 2 oz. spirit, 1 oz. acid, 1 oz. sweet and ½ oz. bitter. Muddle, smash, stir and sip (and always add a pretty garnish). It’s that simple.
Spirits are self-explanatory. For acids, think assorted citrus fruits, vinegar and shrubs. Sweets include agave, honey, simple syrup and natural sugar cubes. Lastly, your bitters range from orange liqueurs and amarettos to chartreuses and bitters. Grab a handful of fresh herbs and berries and go wild.


Miraval Sweet-n-Savory Snack Mix
Ingredients
Instructions
- Mix all the above ingredients in a mixing bowl.
- Add a pinch or two of flaked sea salt, if you’d like.
- Pour onto a prepared baking sheet, ideally a nonstick baking mat or lightly oiled parchment paper.
- Bake for 5 – 7 minutes in a 350° F oven.
- Cool slightly and serve crumbled handfuls in small bowls. Warning: This snack mix won’t last long.
Notes
Miraval’s Cocktail in the Kitchen experience pairs refreshing cocktails and mocktails with tasty light bites prepared by its resident mixologists and chefs. My last class featured this crunchy, slightly sweet snack mix that is uber-easy and sure to become one of your next not-so-guilty pleasures.
SHARE THIS RECIPE

Pop ‘Em Pickled Jalapeños
Crunchy, slightly sweet, and spicy, these Pop 'Em Pickled Jalapeños are perfect for adding a little kick to rice bowls, huevos rancheros, summer sandwiches, and salads (really anywhere you want to introduce some crave-worthy heat).

photo credit:dontrey britt-Hart
15 jalapeños
6 whole garlic cloves, peeled and lightly smashed
2 cups white distilled vinegar
2 cups water
2/3 cup cane sugar
2 tablespoons sea salt
Instructions:
1. Thinly slice the jalapeños and divide them into two (16-ounce) lidded jars. Place three lightly smashed garlic cloves in each jar.
2. Simmer the vinegar, water, sugar, and salt in a small saucepan over low heat until the sugar is dissolved, about 5 minutes, stirring occasionally.
3. Pour the brine over the jalapeños and cool to room temperature.
4. Cover and chill for at least an hour before enjoying, though chilling overnight is ideal.
5. Pop ‘em one crunchy slice at a time.
*Makes two 16-ounce jars.
My Two Cents:
- Mason jars make perfect containers for pickling and even lovelier gifts wrapped with a bow.
- Crunchy, slightly sweet, and spicy, they’re perfect for adding a little kick to rice bowls, huevos rancheros, summer sandwiches, and salads (really anywhere you want to introduce some crave-worthy heat).
- Your pickled jalapeños can be stored in the refrigerator for up to 2 weeks.


Pop ‘Em Pickled Jalapeños
Ingredients
Instructions
- Thinly slice the jalapeños and divide them into two (16-ounce) lidded jars. Place three lightly smashed garlic cloves in each jar.
- Simmer the vinegar, water, sugar, and salt in a small saucepan over low heat until the sugar is dissolved, about 5 minutes, stirring occasionally.
- Pour the brine over the jalapeños and cool to room temperature.
- Cover and chill for at least an hour before enjoying, though chilling overnight is ideal.
- Pop ‘em one crunchy slice at a time.
Notes
- Mason jars make perfect containers for pickling and even lovelier gifts wrapped with a bow.
- Crunchy, slightly sweet, and spicy, they’re perfect for adding a little kick to rice bowls, huevos rancheros, summer sandwiches, and salads (really anywhere you want to introduce some crave-worthy heat).
- Your pickled jalapeños can be stored in the refrigerator for up to 2 weeks.
SHARE THIS RECIPE

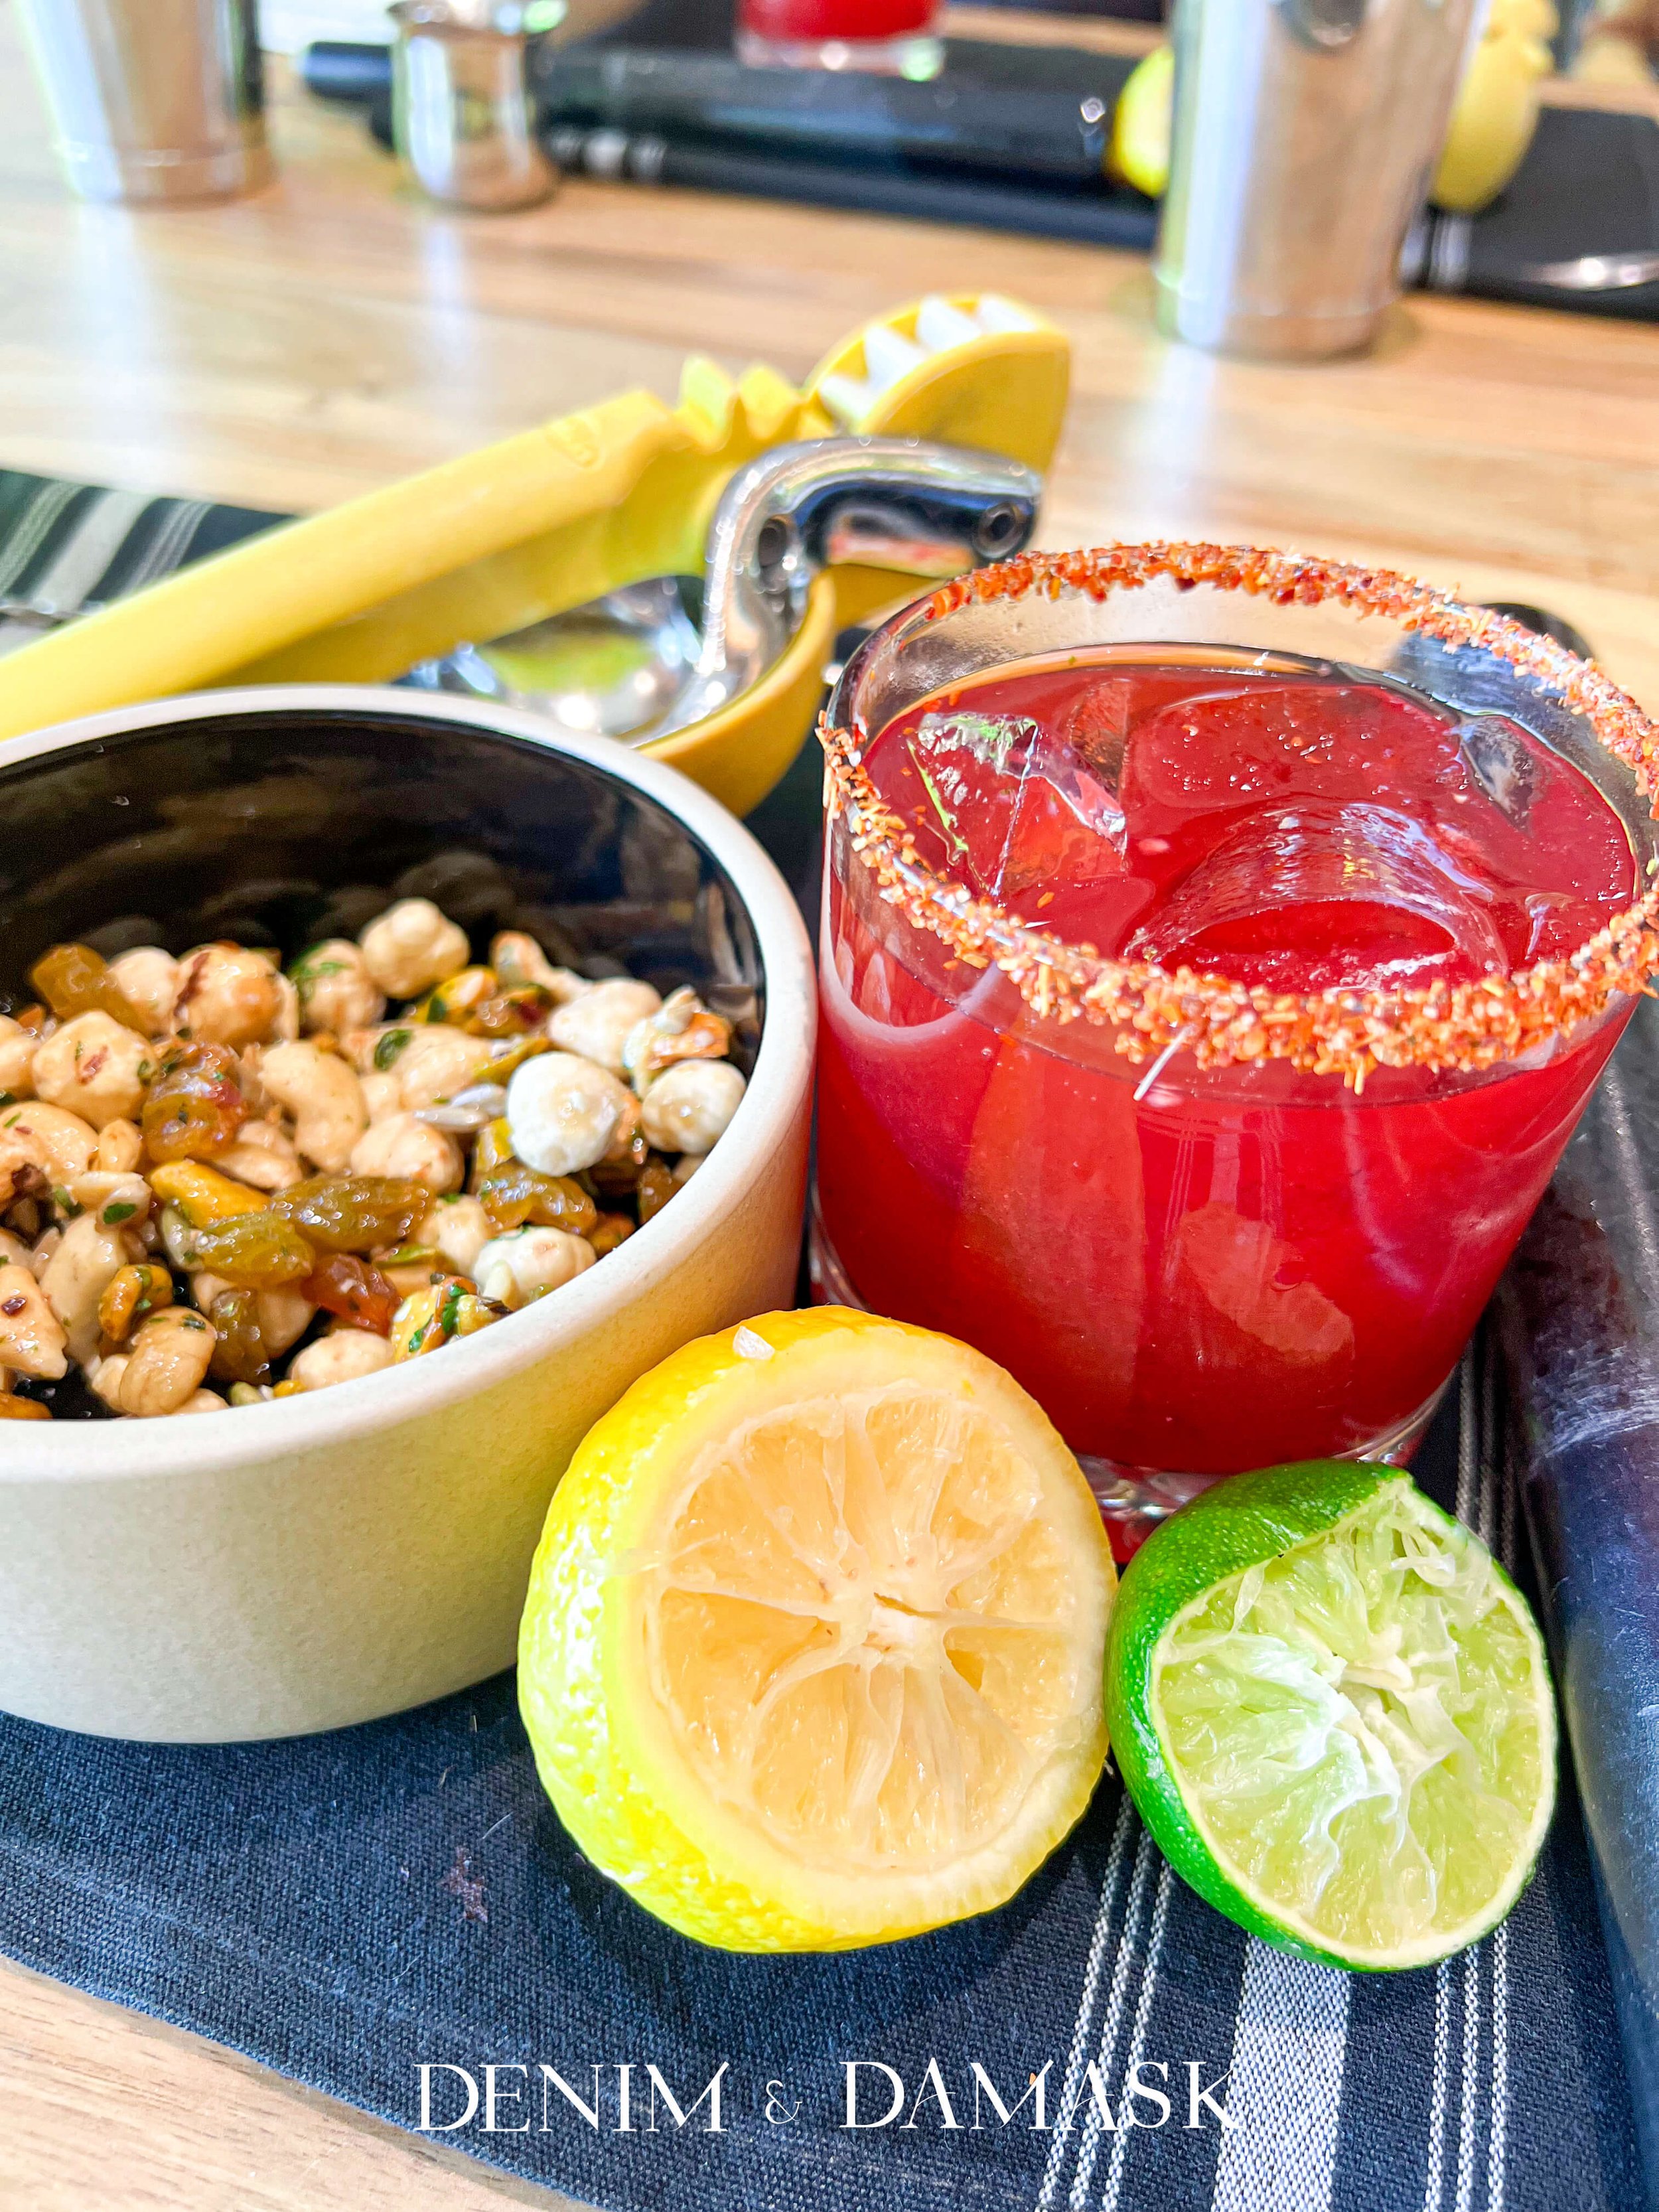
Sonoran Sunset
Warning: Proceed with caution. These coups may look all sweet and innocent, but they pack quite a punch!

photo credit:dontrey britt-Hart
Instructions:
2 cups Seedlip Grove 42 (mocktail) or orange-infused vodka (cocktail)
1 cup freshly squeezed lemon juice
1 cup cranberry juice
1 cup hibiscus simple syrup*
Ice
16 fresh jalapeño rings
Optional garnishes: Dehydrated citrus slices (oranges, limes, or lemons), edible flowers
1. To make the hibiscus simple syrup, mix two cups of sugar with two cups of water in a small saucepan over a medium flame. Heat and stir until the sugar is fully dissolved, but do not boil. Steep six hibiscus tea bags in simple syrup for 5 – 7 minutes. Allow the syrup to cool to room temperature before using or storing. Transfer the simple syrup to a glass container. You’ll have extra to store in the refrigerator for your next pitcher.
2. Combine the cranberry, fresh lemon juice, and hibiscus simple syrup in a pourable container. Stir well and keep chilled until ready to serve.
3. For mocktails, add the Seedlip Grove 42 to the juice mixture, stir gently, and set aside. You can adjust the sweetness by increasing or decreasing the simple syrup to taste.
4. For cocktails, add the orange-infused vodka to the juice mixture. Refrigerate the Sonoran Sunset cocktail until you’re ready to pour.
5. When you’re ready to serve, muddle four jalapeño rings in a pitcher, add ice, followed by the mocktail/cocktail mixture, and stir well. Using a Hawthorne cocktail strainer, fill coupe cocktail or martini glasses and garnish with a fresh jalapeño ring in each glass.
*Makes 8 refreshing servings.
Sit back & take in the sunset!
My Two Cents:
- Warning: Proceed with caution. These coups may look all sweet and innocent, but they pack quite a punch!
- Ruby red hibiscus tea blossoms add a boost of flower power and hints of berry and citrus to this refreshing glass of deliciousness.
- Did you know that hibiscus flowers are not only aesthetically exquisite but also packed with antioxidants and several other health benefits? Mmmmm. Even tastier.


Sonoran Sunrise
Ingredients
Instructions
- To make the hibiscus simple syrup, mix two cups of sugar with two cups of water in a small saucepan over a medium flame. Heat and stir until the sugar is fully dissolved, but do not boil. Steep six hibiscus tea bags in simple syrup for 5 – 7 minutes. Allow the syrup to cool to room temperature before using or storing. Transfer the simple syrup to a glass container. You’ll have extra to store in the refrigerator for your next pitcher.
- Combine the cranberry, fresh lemon juice, and hibiscus simple syrup in a pourable container. Stir well and keep chilled until ready to serve.
- For mocktails, add the Seedlip Grove 42 to the juice mixture, stir gently, and set aside. You can adjust the sweetness by increasing or decreasing the simple syrup to taste.
- For cocktails, add the orange-infused vodka to the juice mixture. Refrigerate the Sonoran Sunset cocktail until you’re ready to pour.
- When you’re ready to serve, muddle four jalapeño rings in a pitcher, add ice, followed by the mocktail/cocktail mixture, and stir well. Using a Hawthorne cocktail strainer, fill coupe cocktail or martini glasses and garnish with a fresh jalapeño ring in each glass.
Notes
My Two Cents:
- Warning: Proceed with caution. These coups may look all sweet and innocent, but they pack quite a punch!
- Ruby red hibiscus tea blossoms add a boost of flower power and hints of berry and citrus to this refreshing glass of deliciousness.
- Did you know that hibiscus flowers are not only aesthetically exquisite but also packed with antioxidants and several other health benefits? Mmmmm. Even tastier.
SHARE THIS RECIPE
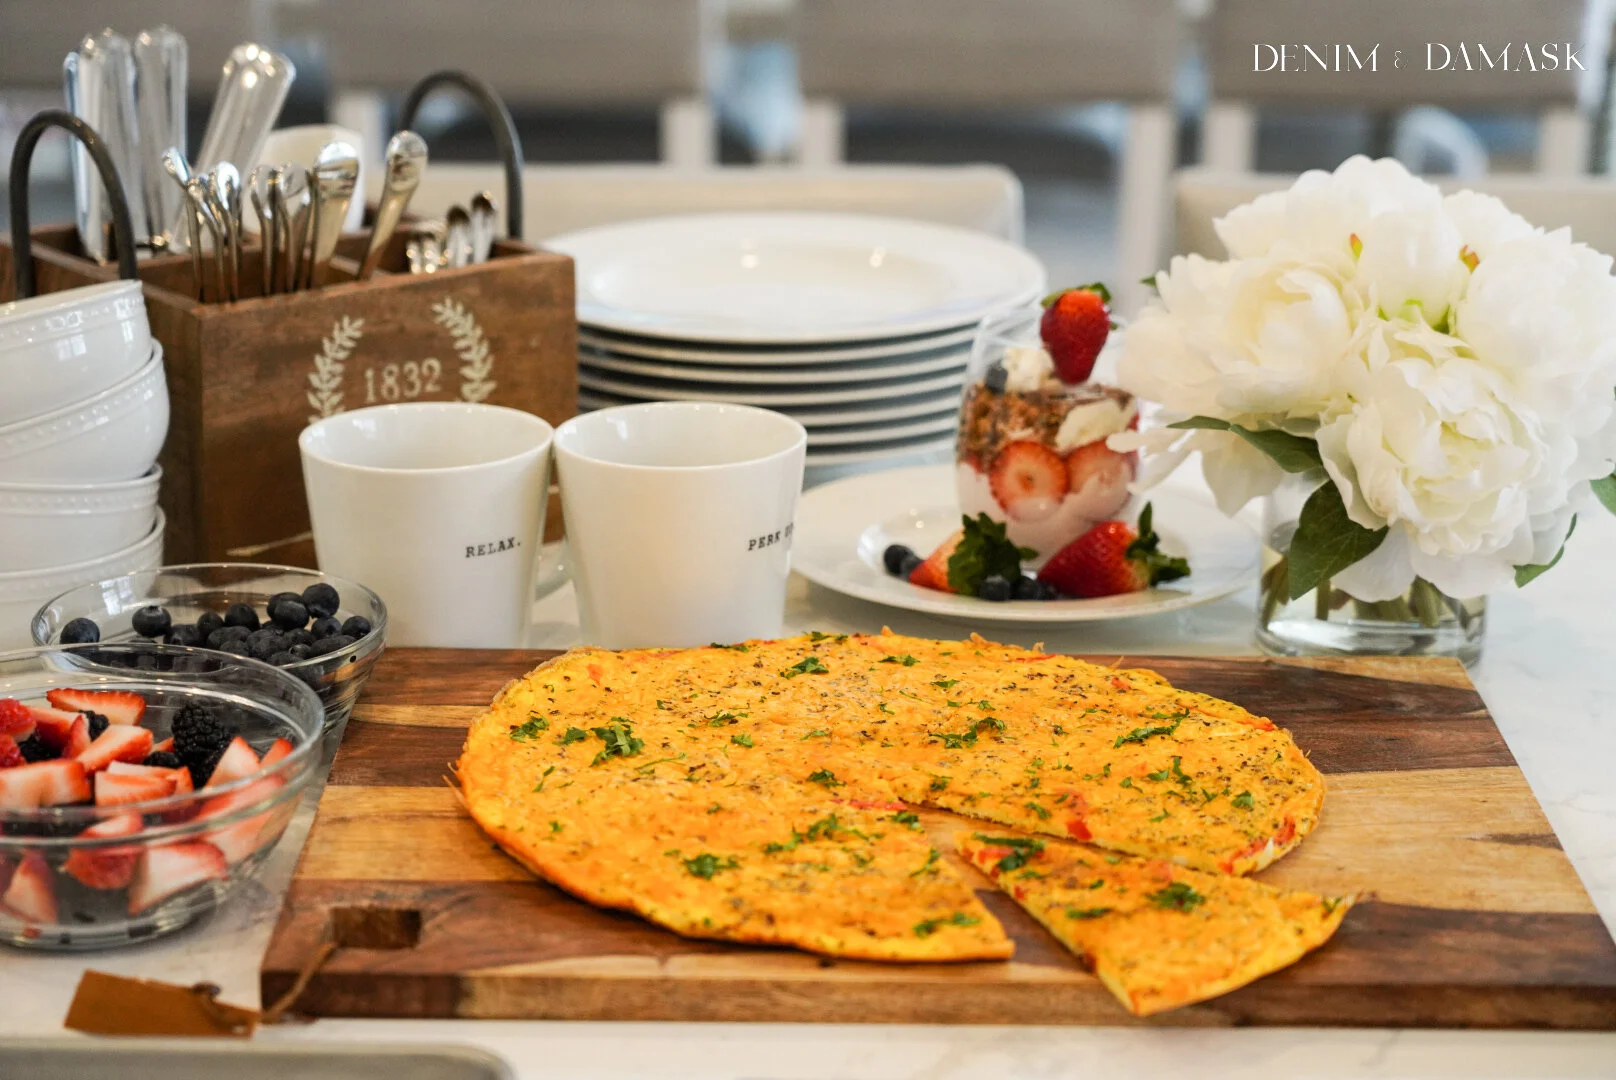
Potato & Pepper Frittata
Frittatas and omelets are kissing cousins. One is cooked slowly over low heat and, in this instance, finished in the oven; it can be served hot or at room temperature, making it a great brunch item. The other is cooked quickly over high heat and typically served immediately. I’ll let you guess which is which.

Photo credit: Dontrey Britt-Hart
Instructions:
1. Preheat your oven to 350°F.
2. Prepare all of the vegetables according to the ingredients section.
3. In a large bowl, whisk together the eggs, half and half, red pepper flakes*, black pepper, and 1 teaspoon of paprika. (Hold off on the salt for now.)
4. Heat olive oil in a medium-sized, nonstick, oven-safe skillet over medium heat. When the oil is hot, carefully add the potatoes in a single layer, sprinkle with salt and pepper to taste, and add the remaining teaspoon of paprika. Brown the potatoes on one side.
5. Once you flip the potatoes over, add the onions, spreading them evenly around the skillet. Stirring occasionally, cook until the potatoes and onions are tender, about 7 – 10 minutes.
6. Smooth the potato and onion mixture out to create a base for your frittata.
7. Add the salt to the eggs in your bowl, then pour the whisked egg mixture evenly around the skillet.
8. Reduce the heat to medium-low and gently swirl your skillet until the egg mixture spreads evenly over the potatoes and onions. Arrange the red bell peppers across the top of the eggs and sprinkle with cheese. Cook for one minute on the stovetop.
9. Place the skillet into the oven until the eggs are set, about 10 – 12 minutes.
10. Run a spatula along the frittata's perimeter to lightly lift the edges, then slide it onto a platter. Sprinkle parsley over the top. Cut into wedges and serve.
2 tablespoons olive oil
1 large potato, red, russet or Yukon gold, peeled, thinly sliced
1 small onion, thinly sliced
1 red bell pepper, seeded and sliced
8 large eggs
¼ cup half and half or whole milk
¾ cup grated or shredded cheese (try Manchego, Parmesan or Muenster)
½ teaspoon red pepper flakes*
2 teaspoons smoked paprika
1 teaspoon Kosher salt
½ teaspoon coarsely ground black pepper
2 tablespoons chopped parsley for garnish (optional)
My Two Cents:
Red pepper flakes – Let’s be clear: my family likes spicy food. That said, in many of the recipes on this blog you’ll likely see an asterisk or side note about the level of spice mentioned in the ingredient’s section versus what we actually use in our kitchen. More than one friend has either asked that we make a “visitor-friendly” batch of whatever’s on the stove or they grab a large cup of an iced beverage to enjoy with their meal. The dishes we cook are honestly not hot by most spice standards; we just seem to love people with mild palates.
Frittatas and omelets are kissing cousins. One is cooked slowly over low heat and, in this instance, finished in the oven; it can be served hot or at room temperature, making it a great brunch item. The other is cooked quickly over high heat and typically served immediately. I’ll let you guess which is which.
The beauty of frittatas is their ease and endless varieties: swap in your favorite cheese, throw in your preferred veggies. The options are endless: feta, swiss, cheddar, gouda, spinach, broccoli, artichokes, mushrooms, zucchini . . . the list goes on. Go crazy and savor every tasty bite.
Potato & Pepper Frittata

Ingredients
Instructions
- Preheat your oven to 350°F.
- Prepare all of the vegetables according to the ingredients section.
- In a large bowl, whisk together the eggs, half and half, red pepper flakes*, black pepper, and 1 teaspoon of paprika. (Hold off on the salt for now.)
- Heat olive oil in a medium-sized, nonstick, oven-safe skillet over medium heat. When the oil is hot, carefully add the potatoes in a single layer, sprinkle with salt and pepper to taste, and add the remaining teaspoon of paprika. Brown the potatoes on one side.
- Once you flip the potatoes over, add the onions, spreading them evenly around the skillet. Stirring occasionally, cook until the potatoes and onions are tender, about 7 – 10 minutes.
- Smooth the potato and onion mixture out to create a base for your frittata.
- Add the salt to the eggs in your bowl, then pour the whisked egg mixture evenly around the skillet.
- Reduce the heat to medium-low and gently swirl your skillet until the egg mixture spreads evenly over the potatoes and onions. Arrange the red bell peppers across the top of the eggs and sprinkle with cheese. Cook for one minute on the stovetop.
- Place the skillet into the oven until the eggs are set, about 10 – 12 minutes.
- Run a spatula along the frittata's perimeter to lightly lift the edges, then slide it onto a platter. Sprinkle parsley over the top. Cut into wedges and serve.

South Beach Sweet Heat Wings
Some like it spicy & some like it sweet. Well, here’s a 2-for-1. This recipe calls for baked chicken, which is just as tasty (and healthier), and does not have Yardbird’s signature sauce, but this simple, two-ingredient condiment will change the way you look at chicken wings. Be sure to grab plenty of napkins; it’s about to get messy in the best of ways.

photo credit: Dontrey Britt-Hart
Instructions:
4 pounds of split chicken wings
Olive oil
Smoked paprika
Coarse Kosher salt
Coarsely ground black pepper
Granulated garlic powder
½ cup hot sauce
½ cup honey
1. Preheat oven to 400° F. Line a rimmed baking sheet with parchment paper.
2. Pat the wings dry with paper towels, spread them evenly on the prepared baking sheet and drizzle olive oil over them. Season to taste with salt, pepper, garlic powder and paprika.
3. Bake until cooked through and golden brown, about 30 – 45 minutes, turning halfway through.
4. In a small saucepan, combine the hot sauce and honey over low heat, stirring occasionally. Warm until the sauce lightly bubbles, then remove from heat. The sauce will appear thin and watery but will thicken as it cools.
5. Remove the wings from the oven and place them in a large mixing bowl. Pour the sauce over the wings and toss lightly with tongs until they are fully coated.
6. Enjoy the sweet heat.
My Two Cents:
Looking to make your party platter picture perfect? Garnish with a light sprinkle of scallions for a pop of color.
A simple, healthy side dish: crudités and dip. That’s just a fancy French way of saying a vegetable tray with dipping sauces. I warned you that we’re rugged & refined. Consider an array of fresh veggies – celery, carrot sticks, cucumber sticks, bell peppers, broccoli or tomatoes with a vinaigrette, pesto or ranch-style dip.
South Beach Sweet Heat Wings

Ingredients
Instructions
- Preheat oven to 400° F. Line a rimmed baking sheet with parchment paper.
- Pat the wings dry with paper towels, spread them evenly on the prepared baking sheet and drizzle olive oil over them. Season to taste with salt, pepper, garlic powder and paprika.
- Bake until cooked through and golden brown, about 30 – 45 minutes, turning halfway through.
- In a small saucepan, combine the hot sauce and honey over low heat, stirring occasionally. Warm until the sauce lightly bubbles, then remove from heat. The sauce will appear thin and watery but will thicken as it cools.
- Remove the wings from the oven and place them in a large mixing bowl. Pour the sauce over the wings and toss lightly with tongs until they are fully coated.
- Enjoy the sweet heat.
Back Story:

It was a hot, humid, but very memorable Saturday in Miami Beach, FL, in August 2014 – August 23rd to be exact – and with the help of Yelp and some legwork on my girlfriend Geri’s part, she, another friend Shonda and I secured a reservation for dinner at Yardbird Southern Table & Bar. We were drawn in by the Yelp reviews and the cheeky, down-home self-description as “a house of worship to farm-fresh ingredients, classic Southern cooking, hailed bourbon selection, and top-notch hospitality.” While I know little about bourbon, as the granddaughter of a Grenada, Mississippi native who knew her way around the kitchen, I understand a little something about Southern cuisine. This is not a restaurant review, so I’ll stop there, but I did leave with an inspiration to bring a taste of the spicy-sweet sauce Yardbird served with its fried chicken back home to Chicago.
This recipe calls for baked chicken, which is just as tasty (and healthier), and does not have Yardbird’s signature sauce, but this simple, two-ingredient condiment will change the way you look at chicken wings. Be sure to grab plenty of napkins; it’s about to get messy in the best of ways.


SHARE THIS RECIPE

Broiled Lobster Tails with Garlic Dijon Butter
These Broiled Lobster Tails with Garlic Dijon Butter will surely wow your family, friends, and guests with their restaurant-quality presentation in a fraction of the time, 10 minutes to be precise. They’ll call you chef de cuisine and vie for their next reservation after one buttery bite.

photo credit: Dontrey Britt-Hart
4 lobster tails (about 6 oz each)
4 small cloves of garlic, minced
2 heaping teaspoons parsley, chopped
1 ½ tablespoons olive oil
1 ½ tablespoons fresh lemon juice
1 teaspoon Dijon mustard
½ teaspoon sweet smoked paprika
¼ teaspoon garlic powder
¼ teaspoon salt
1/8 teaspoon black pepper
6 tablespoons unsalted butter
Dash cayenne pepper (optional)
Grated Parmesan cheese
Instructions:
1. Preheat the broiler to high.
2. Mix the dry spices in a small bowl and set aside.
3. Rinse the lobster tails in cold water and place them on a cutting board. With kitchen scissors or a sharp knife, carefully cut the top of the lobster shell down the middle from the tip to the tail on the curved side, avoiding the meat.
4. Carefully pry the shells apart to expose the meat and sit on top of the shell.
5. Place the lobster tails on a baking sheet or in an oven-safe dish.
6. Using a small pinch, sprinkle each tail with the spices. Save the remaining dry spices for the butter sauce.
7. Cut two tablespoons of butter into small pats and divide among the four lobster tails.
8. Place in the oven on an upper middle rack.
9. Broil until meat is opaque in the center, about 8-10 minutes. Remove from oven.
10. Dust each lobster tail with a light layer of grated Parmesan and serve immediately with the Garlic Dijon Butter* and a sprinkle of fresh, chopped parsley (*see next steps).
11. While the lobster is cooking, prepare the Garlic Dijon Butter. Melt 4 tablespoons of butter with ½ tablespoon olive oil in a saucepan over medium to low heat. Add the minced garlic, stirring for approximately two minutes, until soft.
12. In a small bowl, mix one heaping teaspoon of parsley, Dijon mustard, dry spices, lemon juice, one tablespoon of olive oil, and melted garlic butter. Stir well.
Kudos to the Chef!


My Two Cents:
These Broiled Lobster Tails with Garlic Dijon Butter will surely wow your family, friends, and guests with their restaurant-quality presentation in a fraction of the time, 10 minutes to be precise. They’ll call you chef de cuisine and vie for their next reservation after one buttery bite.
Wedges of extra lemon are always a perfect accompaniment to seafood.
Fully cooked lobster will have an internal temperature of 135 to 140 degrees F.

Broiled Lobster Tails with Garlic Dijon Butter
Ingredients
Instructions
- Preheat the broiler to high.
- Mix the dry spices in a small bowl and set aside.
- Rinse the lobster tails in cold water and place them on a cutting board. With kitchen scissors or a sharp knife, carefully cut the top of the lobster shell down the middle from the tip to the tail on the curved side, avoiding the meat.
- Carefully pry the shells apart to expose the meat and sit on top of the shell.
- Place the lobster tails on a baking sheet or in an oven-safe dish.
- Using a small pinch, sprinkle each tail with the spices. Save the remaining dry spices for the butter sauce.
- Cut two tablespoons of butter into small pats and divide among the four lobster tails.
- Place in oven on an upper middle rack.
- Broil until meat is opaque in the center, about 8-10 minutes.
- Dust each lobster tail with a light layer of grated Parmesan and serve immediately with the Garlic Dijon Butter* and a sprinkle of fresh, chopped parsley (*see next steps).
- While the lobster is cooking, prepare the Garlic Dijon Butter. Melt 4 tablespoons of butter with ½ tablespoon olive oil in a saucepan over medium to low heat. Add the minced garlic, stirring for approximately two minutes, until soft.
- In a small bowl, mix one heaping teaspoon of parsley, Dijon mustard, dry spices, lemon juice, one tablespoon of olive oil, and melted garlic butter. Stir well.
Notes
My Two Cents:
- These Broiled Lobster Tails with Garlic Dijon Butter will surely wow your family, friends, and guests with their restaurant-quality presentation in a fraction of the time, 10 minutes to be precise. They’ll call you chef de cuisine and vie for their next reservation after one buttery bite.
- Wedges of extra lemon are always a perfect accompaniment to seafood.
- Fully cooked lobster will have an internal temperature of 135 to 140 degrees F.
SHARE THIS RECIPE

Sparkling Raspberry Kiss
This bubbly libation is as sweet and simple as a first kiss. With a few simple ingredients and beautiful stemware, you can make any moment feel like a special occasion.

photo credit:dontrey britt-Hart
Instructions:
Raspberry sorbet
8 fresh raspberries
1 bottle of prosecco or sparkling grape juice
Toothpicks
1. Skewer two fresh raspberries on a toothpick. Repeat for the number of cocktails/mocktails being served. Place in a freezer-safe container and freeze for at least one hour.
2. In your prettiest champagne flute, add a scoop of raspberry sorbet (two, if you’re feeling fancy) and top with your favorite bubbles – prosecco or sparkling grape juice.
3. Garnish with your frozen, fresh raspberries and pucker up.
Serves 4.
My Two Cents:
My Two Cents:
This bubbly libation is as sweet and simple as a first kiss. With a few simple ingredients and beautiful stemware, you can make any moment feel like a special occasion.
Have some fun and switch up the sorbet flavors and berries to suit your palate. Strawberries, mangoes, and lemons are tasty options.
XOXO
Muah!


Sparkling Raspberry Kiss
Ingredients
Instructions
- Skewer two fresh raspberries on a toothpick. Repeat for the number of cocktails/mocktails being served. Place in a freezer-safe container and freeze for at least one hour.
- In your prettiest champagne flute, add a scoop of raspberry sorbet (two, if you’re feeling fancy) and top with your favorite bubbles – prosecco or sparkling grape juice
- Garnish with your frozen, fresh raspberries and pucker up.
Notes
XOXO
Muah!
SHARE THIS RECIPE

Cozy Broccoli Cheddar Soup
Trust me when I tell you that this Cozy Broccoli Cheddar Soup will win over even your most finicky of eaters (lactose intolerant and vegan friends aside). On a cold, dreary day, it’s a warm hug in a pretty bowl.
You’re welcome.
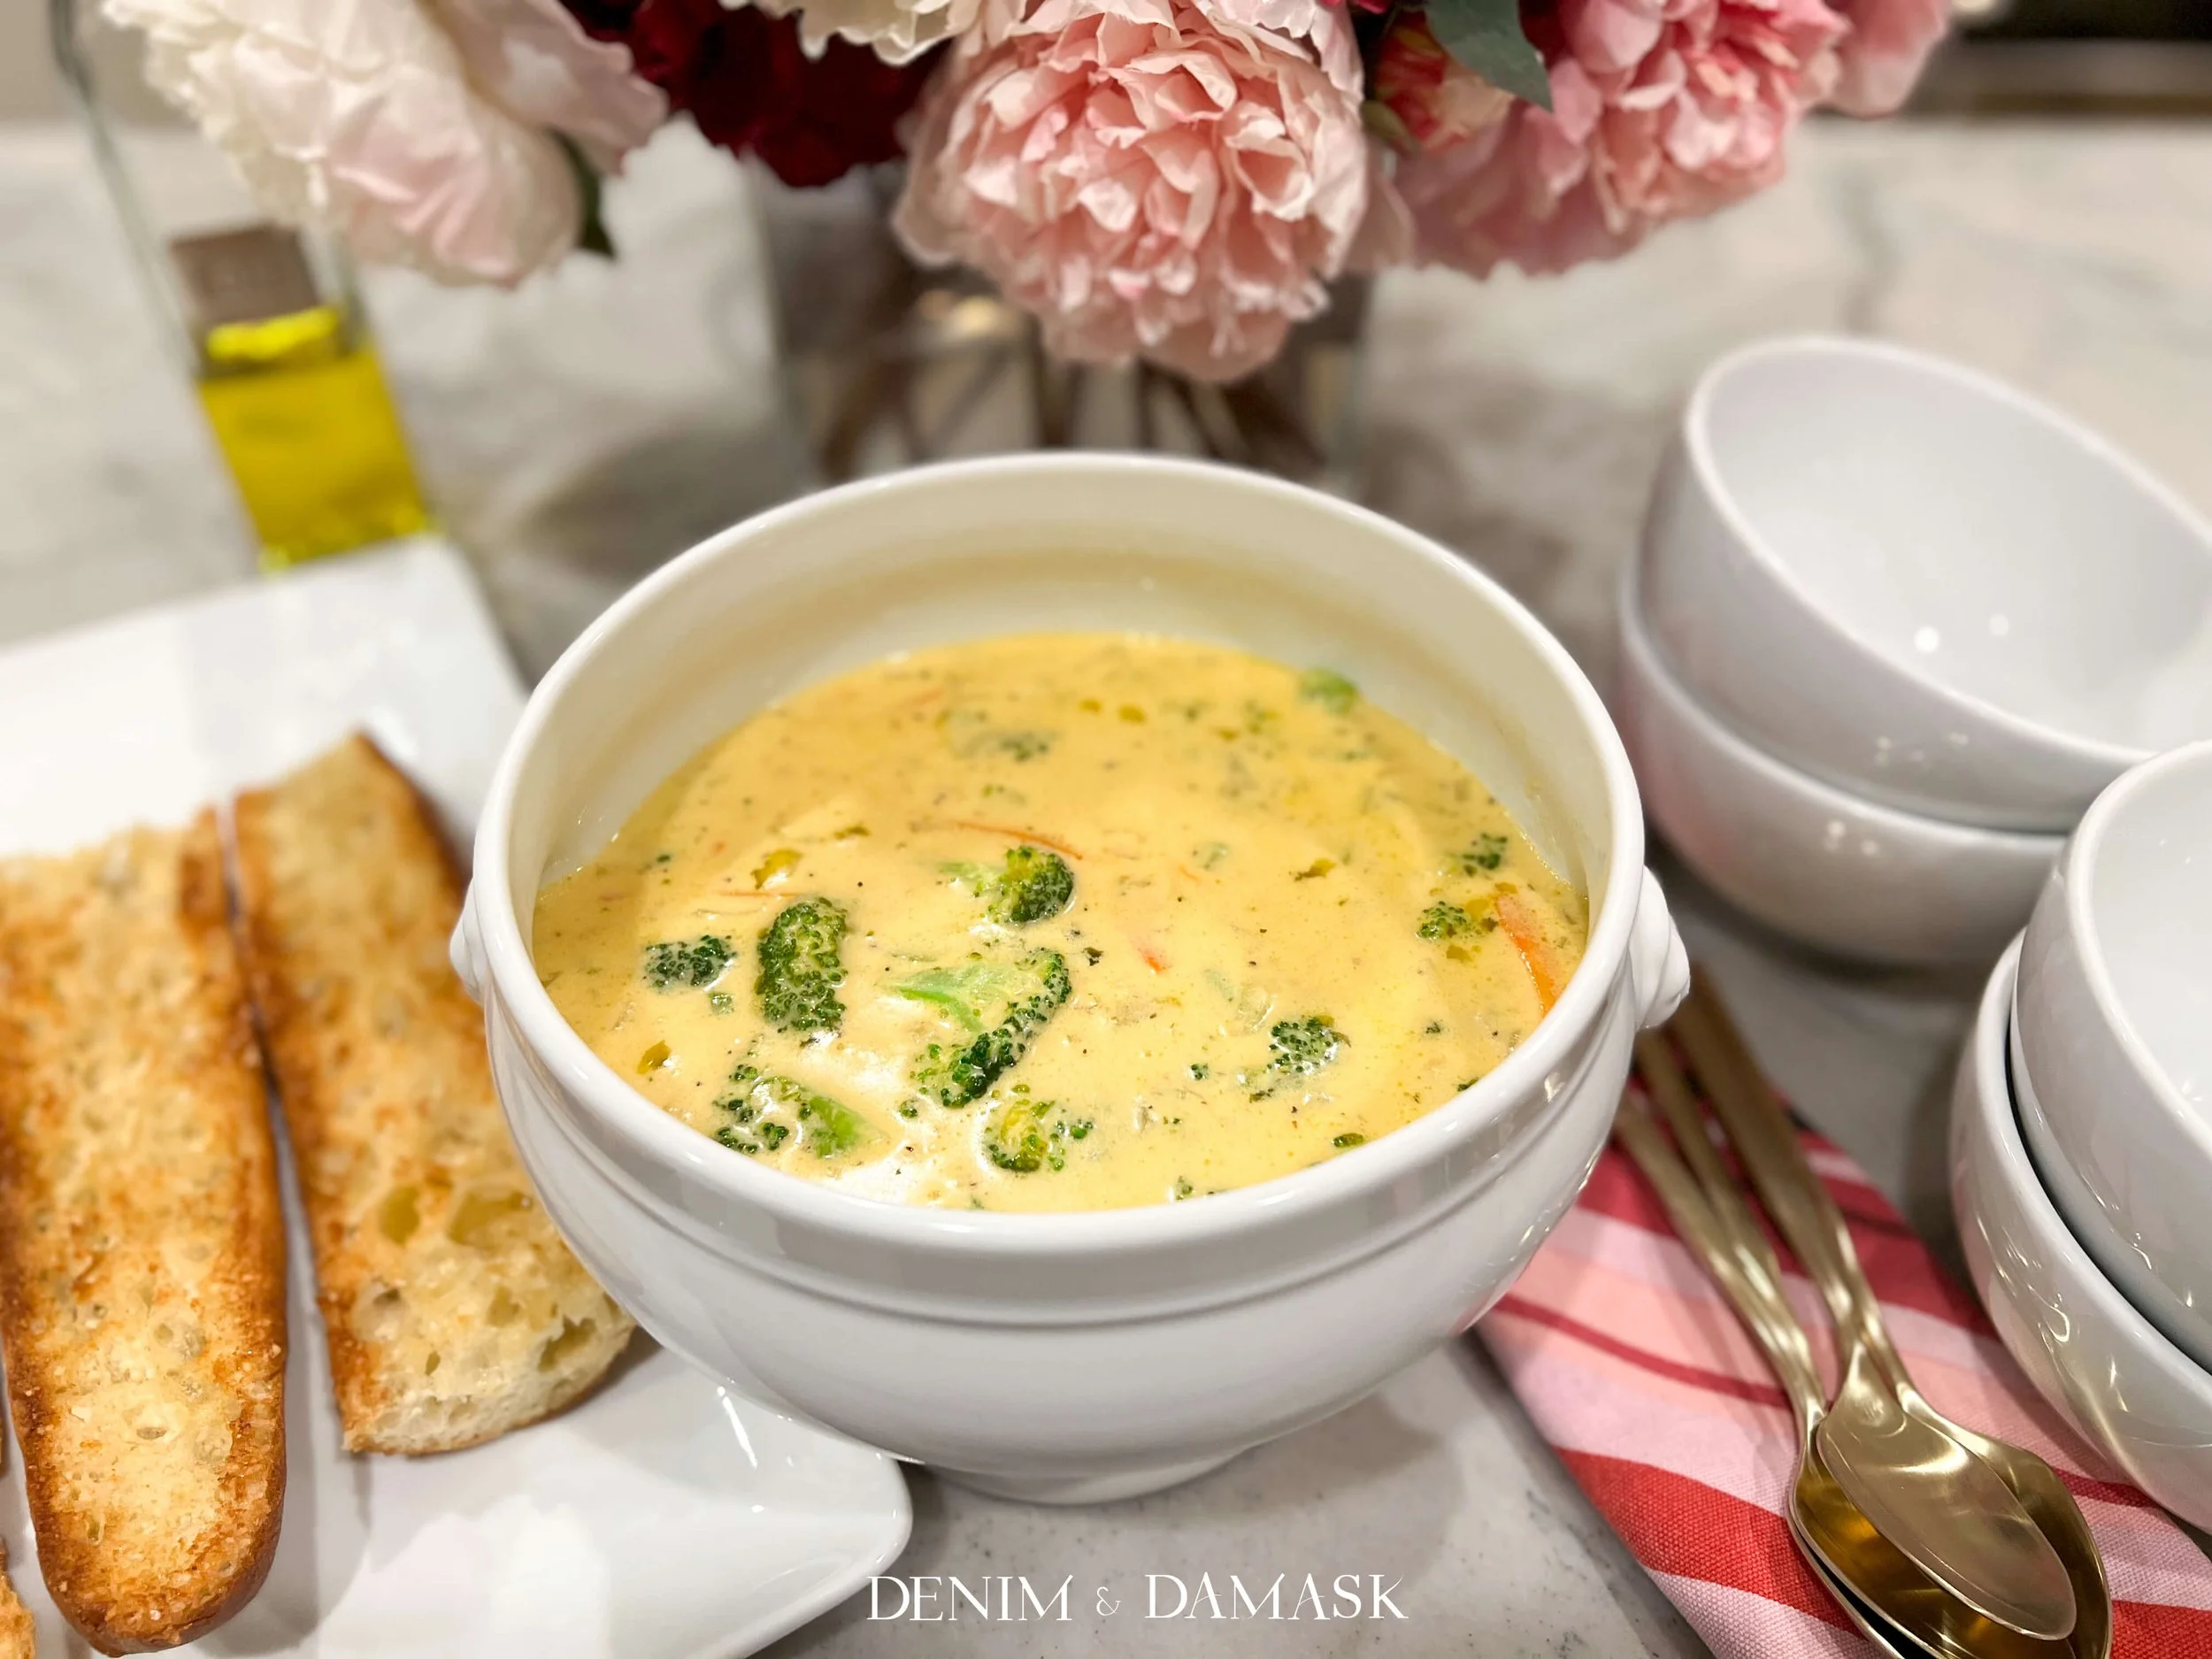
Photo credit: Dontrey Britt-Hart
Instructions:
1. Melt the butter in a Dutch oven and sauté the onions until soft. Add garlic. Sprinkle the flour over the mixture, stir well, and cook over medium heat for 1-2 minutes. *I highly recommend silicone or wooden utensils to avoid scratching your cookware.
2. Whisk in the chicken stock and half & half.
3. Add the broccoli and carrots. Cook over low heat for 20-25 minutes or until tender.
4. Add salt and pepper. Return to low heat and add the cheese, stirring often. Beware of overheating the soup, as it can get grainy.
Stir in the nutmeg and cayenne pepper, if desired.
¼ cup melted butter
½ medium chopped onion
1 clove minced garlic
¼ cup flour
2 cups half-and-half cream
2 cups low-sodium chicken stock or broth
3 cups broccoli (approximately ½ pound), chopped into bite-size pieces
1 cup carrots, julienned
¼ teaspoon nutmeg
¼ teaspoon cayenne pepper, optional
2 cups grated sharp cheddar cheese (8 ounces)
salt and pepper, to taste


My Two Cents:
For a smoother consistency, blend about 1 cup of the soup and return to Dutch Oven, mixing well.
For texture and presentation, roast additional broccoli drizzled with olive oil on a sheet pan in the oven at 400°F for 15 to 20 minutes. Season with salt, pepper, red pepper flakes, and a squeeze of lemon juice. It adds a tasty pop and crunch to this creamy bowl of comfort.
One of our favorite pairings is a side of warm Garlic Parmesan Toasted Baguettes.
Back Story:
While we love our veggies over here in the Hart household, broccoli is a dirty word for one of my sons, who shall go unnamed. That is, until it was paired with one of his greatest loves: cheese.
Trust me when I tell you that this Cozy Broccoli Cheddar Soup will win over even your most finicky of eaters (lactose intolerant and vegan friends aside). On a cold, dreary day, it’s a warm hug in a pretty bowl.
You’re welcome.

Cozy Broccoli Cheddar Soup
Ingredients
Instructions
- Melt the butter in a Dutch oven and sauté the onions until soft. Add garlic. Sprinkle the flour over the mixture, stir well, and cook over medium heat for 1-2 minutes. *I highly recommend silicone or wooden utensils to avoid scratching your cookware.
- Whisk in the chicken stock and half & half.
- Add the broccoli and carrots. Cook over low heat for 20-25 minutes or until tender.
- Add salt and pepper. Return to low heat and add the cheese, stirring often. Beware of overheating the soup, as it can get grainy.
- Stir in the nutmeg and cayenne pepper, if desired.
Notes
My Two Cents:
- For a smoother consistency, blend about 1 cup of the soup and return to Dutch Oven, mixing well.
- For texture and presentation, roast additional broccoli drizzled with olive oil on a sheet pan in the oven at 400°F for 15 to 20 minutes. Season with salt, pepper, red pepper flakes, and a squeeze of lemon juice. It adds a tasty pop and crunch to this creamy bowl of comfort.
- One of our favorite pairings is a side of warm Garlic Parmesan Toasted Baguettes.

Over the Rainbow Refresher
This refreshing burst of berries and citrus muddled with herbaceous notes of basil is a balanced mocktail that reminds us just how festive libations sans alcohol can be. Of course, you can easily convert this mocktail into a cocktail with a simple ingredient swap.

photo credit:dontrey britt-Hart
½ fresh orange
½ fresh lime
½ fresh lemon
2 fresh strawberries
4 fresh blueberries
2 fresh basil leaves
1 ½ teaspoons honey or agave syrup
2 ounces Seedlip Grove 42 non-alcoholic spirit
2 ounces ginger beer
Ice
Instructions:
In a Boston Shaker, add strawberries, blueberries, and basil leaves.
Squeeze juice from citrus fruits using a citrus squeezer or juicer and add to the Boston Shaker.
With a muddle stick, firmly mash the ingredients until well-mixed.
Add honey or agave, as well as the Seedlip Grove 42 and 1 cup of ice.
Cover the Boston Shaker and shake, shake, shake for the count of 8.
Fill an 8-oz. glass with ice and, using the strainer top, pour the drink from the Boston Shaker into the glass.
Top with the ginger beer, lightly swirl, then sip & savor your spritzer.
Makes one thirst-quenching glass.
Cheers!
*Music makes everything tastier and more festive, so I’ve shared a link below for some Over the Rainbow Refresher mood music. It will transport you to paradise.
My Two Cents:
My Two Cents:
This refreshing burst of berries and citrus muddled with herbaceous notes of basil is a balanced mocktail that reminds us just how festive libations sans alcohol can be.
Get creative with your garnishes, especially since you’ve added every color of the rainbow. Halve strawberries; plop a blueberry or two into your drink; add a slice of lemon, lime or orange to the rim of your glass; tuck a leaf of basil between cubes of ice. There’s no limit to the pretty.
If cocktails are more your speed, substitute 2 ounces of Seedlip Grove 42 and replace it with 2 ounces of tequila, gin or vodka.


OVER THE RAINBOW REFRESHER
Ingredients
Instructions
- In a Boston Shaker, add strawberries, blueberries, and basil leaves.
- Squeeze juice from citrus fruits using a citrus squeezer or juicer and add to the Boston Shaker.
- With a muddle stick, firmly mash the ingredients until well mixed.
- Add honey or agave, as well as the Seedlip Grove 42 and 1 cup of ice.
- Cover the Boston Shaker and shake, shake, shake for the count of 8.
- Fill an 8-oz. glass with ice and, using the strainer top, pour the drink from the Boston Shaker into the glass.
- Top with the ginger beer, lightly swirl, then sip & savor your spritzer.
Notes
My Two Cents:
- This refreshing burst of berries and citrus muddled with herbaceous notes of basil is a balanced mocktail that reminds us just how festive libations sans alcohol can be.
- Get creative with your garnishes, especially since you’ve added every color of the rainbow. Halve strawberries; plop a blueberry or two into your drink; add a slice of lemon, lime or orange to the rim of your glass; tuck a leaf of basil between cubes of ice. There’s no limit to the pretty.
- If cocktails are more your speed, substitute 2 ounces of Seedlip Grove 42 and replace it with 2 ounces of tequila, gin or vodka.
Cheers!
SHARE THIS RECIPE

Mingle, Jingle & Rock the Bells
Brighten up your winter with this festive mix of holiday hits and R&B classics. From Denim & Damask to you, Happiest Holidays!
By Dontrey Britt-Hart

Here’s a little holiday gift to move you through your workday, liven up your home, help “sleigh” your commute and add some sparkle ✨ to your weekend.
Happy December D&D Fam! ❤️💚

Warm Spiced Cider
If you could bottle up the scent of cinnamon, apples and oranges with the coziness of a fall sweater and ladle it into a mug, you’d get the best of this Warm Spiced Cider. Close your eyes, inhale and savor every sip.

photo credit:dontrey britt-Hart
8 cups fresh apple cider
2 cinnamon sticks
2 oranges, peels and juice
4 whole cloves
4 star anise
Instructions:
1. Slice one orange into rounds for garnish and set aside. With the second orange, slice the peels into large strips before juicing both halves.
2. In a large saucepan over low heat, combine cider, spices, fresh orange juice and orange peels. Heat until warm.
3. Ladle into mugs, garnish with fresh orange slices and savor every spiced sip.
My Two Cents:·
This recipe makes six servings.
Get creative with your garnishes, including additional cinnamon sticks or apple rounds.
Autumn at the Hart house, especially Halloween, has become synonymous with Warm Spiced Cider. Every year our scarecrows go up in the front yard, our clear beverage bins are filled with candy near the front door and a batch of cider is simmering on the stove. Long after the scarecrows are replaced with Thanksgiving pumpkins and Christmas evergreen, the cider remains. Enjoy the aromas and flavors of fall all year long.
Warm & Spicy!


Warm Spiced Cider

Ingredients
Instructions
- Slice one orange into rounds for garnish and set aside. With the second orange, slice the peels into large strips before juicing both halves.
- In a large saucepan over low heat, combine cider, spices, fresh orange juice and orange peels. Heat until warm.
- Ladle into mugs, garnish with fresh orange slices and savor every spiced sip.
Notes:
· This recipe makes six servings.
· Get creative with your garnishes, including additional cinnamon sticks or apple rounds.
Autumn at the Hart house, especially Halloween, has become synonymous with Warm Spiced Cider. Every year our scarecrows go up in the front yard, our clear beverage bins are filled with candy near the front door and a batch of cider is simmering on the stove. Long after the scarecrows are replaced with Thanksgiving pumpkins and Christmas evergreen, the cider remains. Enjoy the aromas and flavors of fall all year long.
Warm & spicy!
SHARE THIS RECIPE

Cajun Peppered Shrimp
Garlic and butter and pepper, oh my! This Cajun Peppered Shrimp will have you waving your napkin in the air as if you’re marching down the streets of New Orleans in a second line parade to the sounds of a brass band. (I suggest you keep the napkin close by. You’ll need it.)

photo credit: Dontrey Britt-Hart
3 cups unsalted butter
1 (8-ounce) bottle clam juice
10 garlic cloves, minced
4 bay leaves, minced
4 teaspoons dried rosemary, minced or 1 tablespoon fresh rosemary, minced
1 teaspoon dried basil or 4 teaspoons chopped fresh basil
1 teaspoon dried oregano or 4 teaspoons chopped fresh oregano
1 ½ teaspoon salt
1 teaspoon red (cayenne) pepper
1 teaspoon nutmeg
1 tablespoon Hungarian paprika
¼ cup finely ground black pepper
¼ cup fresh lemon juice
6 pounds uncooked, unpeeled shrimp
Instructions:
1. In a Dutch oven, melt butter over medium heat.
2. Add garlic and soften slightly, then add clam juice, all spices, salt, pepper and lemon juice.
3. Cook, uncovered, until butter is a rich brown color, approximately 15 – 20 minutes. Stir occasionally.
4. Add shrimp to butter sauce and stir gently to coat well. Cook over medium heat until all of the shrimp are pink, about 10 minutes.
5. Ladle shrimp and the buttery sauce onto small plates. Enjoy with slices of French bread to soak up the rich, peppered goodness.
Grab extra napkins!
My Two Cents:
Garlic and butter and pepper, oh my! This Cajun Peppered Shrimp will have you waving your napkin in the air as if you’re marching down the streets of New Orleans in a second line parade to the sounds of a brass band. (I suggest you keep the napkins close by. You’ll need them.) Prepare your taste buds for an explosion of flavor.
This recipe makes about six servings.
Chopped fresh parsley adds the perfect finishing touch.

street musicians in new orleans

a closer look at a bowl of yum!

family fun in new orleans(2019)
Cajun Peppered Shrimp

Ingredients
Instructions
- In a Dutch oven, melt butter over medium heat.
- Add garlic and soften slightly, then add clam juice, all spices, salt, pepper and lemon juice.
- Cook, uncovered, until butter is a rich brown color, approximately 15 – 20 minutes. Stir occasionally.
- Add shrimp to butter sauce and stir gently to coat well. Cook over medium heat until all of the shrimp are pink, about 10 minutes.
- Ladle shrimp and the buttery sauce onto small plates. Enjoy with slices of French bread to soak up the rich, peppered goodness.
Notes:
- This recipe makes about six servings.
- You’d be wise to keep several napkins on hand and prepare your taste buds for an explosion of flavor.
- Chopped fresh parsley adds the perfect finishing touch.
SHARE THIS RECIPE

Cranberry Noël Cocktail
Tart cranberries meld beautifully with the floral notes of elderflower liqueur in this simple, tasty holiday cocktail you can enjoy all year long. Add a dash of pretty with dehydrated orange slices, fresh rosemary sprigs and frozen cranberries.

photo credit:dontrey britt-Hart
4 limes (zest of one and 4 ounces of juice)
8 ounces vodka
4 ounces St. Germain (elderflower liqueur)
8 ounces cranberry juice
4 - 6 teaspoons simple syrup (optional)
Ice cubes
*Garnish options: frozen cranberries, dehydrated orange slices, lime wedges & fresh rosemary sprigs
Instructions:
1. On a small plate, zest one lime over four tablespoons of sugar. Mix lightly to combine.
2. Moisten the rims of four glasses with lime wedges, then dip the rims in the citrus sugar blend.
3. Combine cranberry juice, lime juice, vodka and St. Germain in a shaker with ice. Feel free to add simple syrup, to taste, if using.
4. Shake, shake, shake and serve, but not before adding a dash of pretty (enter frozen cranberries, rosemary sprigs and citrus).
Bells will be Ringing!
My Two Cents:·
This recipe makes four servings, but it can be easily scaled to serve a party of one or 50+.
To enjoy this festive drink as a mocktail, replace vodka and St. Germain with sparkling water.
To make simple syrup, combine 1 cup of sugar with 1 cup of water and bring to boil in small saucepan until sugar dissolves. Set aside and cool.
For a simple, self-serve bar, set up a tray with your favorite cocktail glasses, a pitcher of the cranberry-lime juice mix; a small container of simple syrup; spirits, sparkling water; lowball glasses filled with rosemary sprigs, dehydrated orange slices, lime wedges and frozen cranberries. A decorative recipe card is a bonus.


Cranberry Noël Cocktail

Ingredients
Instructions
- On a small plate, zest one lime over four tablespoons of sugar. Mix lightly to combine.
- Moisten the rims of four glasses with lime wedges, then dip the rims in the citrus sugar blend.
- Combine cranberry juice, lime juice, vodka and St. Germain in a shaker with ice. Feel free to add simple syrup, to taste, if using.
- Shake, shake, shake and serve, but not before adding a dash of pretty (enter frozen cranberries, rosemary sprigs and citrus).
Notes
· This recipe makes four servings, but it can be easily scaled to serve a party of one or 50+.
· To enjoy this festive drink as a mocktail, replace vodka and St. Germain with sparkling water.
· To make simple syrup, combine 1 cup of sugar with 1 cup of water and bring to boil in small saucepan until sugar dissolves. Set aside and cool.
· For a simple, self-serve bar, set up a tray with your favorite cocktail glasses, a pitcher of the cranberry-lime juice mix; a small container of simple syrup; spirits, sparkling water; lowball glasses filled with rosemary sprigs, dehydrated orange slices, lime wedges and frozen cranberries. A decorative recipe card is a bonus.
Ooh La La!
SHARE THIS RECIPE